Throughout this series, I'm going to show how an Azure Functions instance can map APEX domains, add an SSL certificate and update its public inbound IP address to DNS.
- 3 Ways Mapping APEX Domains to Azure Functions
- Adding Let's Encrypt SSL Certificate to Azure Functions
- Updating Azure DNS and SSL Certificate on Azure Functions via GitHub Actions
- Deploying Azure Functions Apps via GitHub Actions without Publish Profile
In my previous post, I walked through how to update an A record of DNS server and renew the SSL certificate automatically, when an inbound IP of the Azure Functions instance changes, using GitHub Actions workflow. As the last post of this series, I'm going to discuss how to deploy the Azure Functions app through GitHub Actions workflow, without having to know the publish profile.
Azure Functions Action
There is an official GitHub Actions for Azure Functions deployment on GitHub Marketplace. The following YAML pipeline shows how to use it. The publish-profile parameter takes the publish profile of your Azure Functions instance for deployment (line #11).
| jobs: | |
| build-and-deploy: | |
| runs-on: ubuntu-latest | |
| steps: | |
| ... | |
| - name: 'Run Azure Functions Action' | |
| uses: Azure/functions-action@v1 | |
| with: | |
| app-name: ${{ env.AZURE_FUNCTIONAPP_NAME }} | |
| package: '${{ env.AZURE_FUNCTIONAPP_PACKAGE_PATH }}/output' | |
| publish-profile: ${{ secrets.AZURE_FUNCTIONAPP_PUBLISH_PROFILE }} |
As you can see the sample pipeline above, we should store the publish profile onto the repository's secrets. If the publish profile is reset for some reason, the secret MUST be updated with the new profile, manually. It's cumbersome. What if we populate and make use of the publish profile within the GitHub Actions workflow? Yes, we can!
GitHub Action: PowerShell Scripts
In order to populate the publish profile, you need to log-in to Azure PowerShell through Azure Login. The enable-AzPSSession parameter value of true lets you log-in to Azure PowerShell session (line #9).
| jobs: | |
| build-and-deploy: | |
| runs-on: ubuntu-latest | |
| steps: | |
| - name: Login via Az Module | |
| uses: azure/login@v1 | |
| with: | |
| creds: ${{secrets.AZURE_CREDENTIALS}} | |
| enable-AzPSSession: true |
Then, get the publish profile value, using the PowerShell action below (line #10-12). As the publish profile is basically an XML document, you should remove all the line-feed characters to make the XML document into one linear string (line #14). Finally, the XML document is set to an output value (line #16).
| jobs: | |
| build-and-deploy: | |
| runs-on: ubuntu-latest | |
| steps: | |
| ... | |
| - name: Get publish Profile | |
| id: fncapp | |
| shell: pwsh | |
| run: | | |
| $profile = Get-AzWebAppPublishingProfile ` | |
| -ResourceGroupName ${{ secrets.RESOURCE_GROUP_NAME }} ` | |
| -Name ${{ secrets.FUNCTION_APP_NAME }} | |
| $profile = $profile.Replace("`r", "").Replace("`n", "") | |
| Write-Output "::set-output name=profile::$profile" |
Once it's done, let's render the output value on the workflow log.
| jobs: | |
| build-and-deploy: | |
| runs-on: ubuntu-latest | |
| steps: | |
| ... | |
| - name: Get publish Profile | |
| id: fncapp | |
| ... | |
| - name: Show publish profile | |
| shell: pwsh | |
| run: | | |
| echo ${{ steps.fncapp.outputs.profile }} |
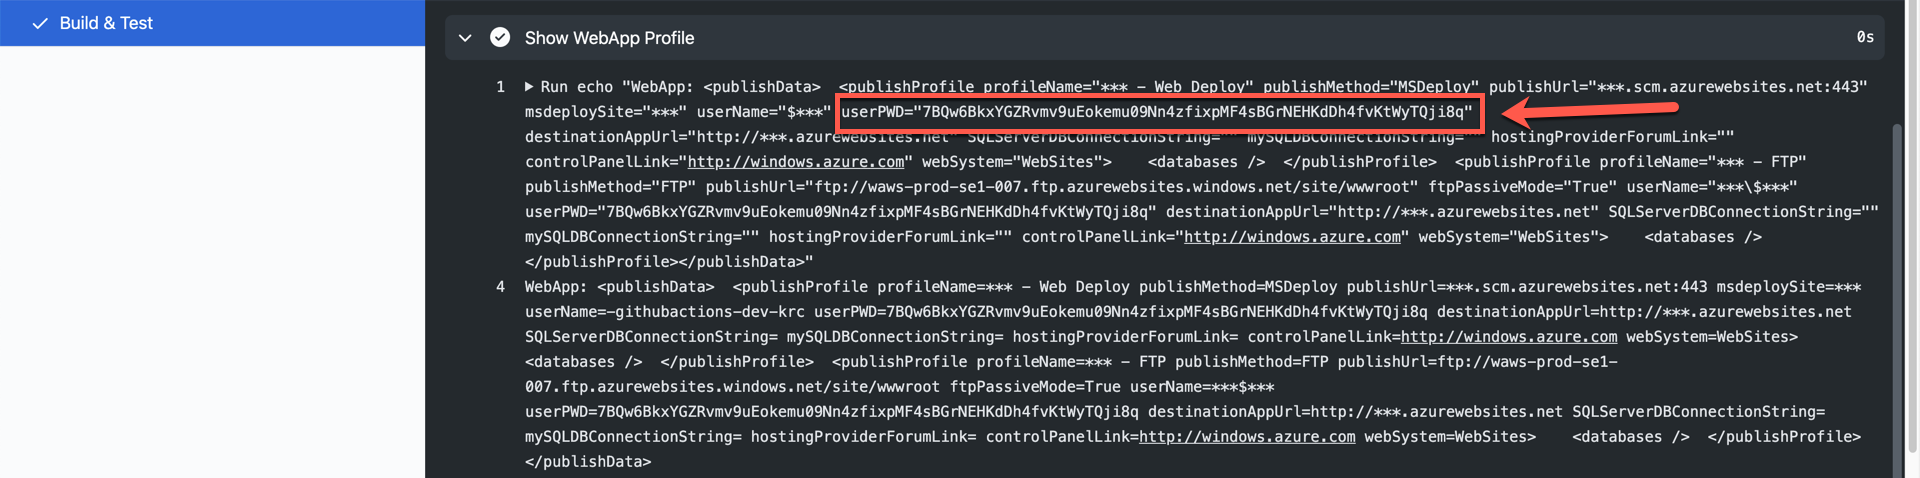
The result might look like the following. Here's the weird thing. We got the publish profile successfully, but the password part is not properly masked. Therefore, as soon as the publish profile is displayed like this, we MUST assume that this publish profile is no longer safe to use.
I mean, the publish profile itself is still valid. But after the deployment, it's safe to reset the profile from the security perspective. Therefore, use the following action to reset the publish profile (line #9-13).
| jobs: | |
| build-and-deploy: | |
| runs-on: ubuntu-latest | |
| steps: | |
| ... | |
| - name: Reset publish Profile | |
| shell: pwsh | |
| run: | | |
| $profile = Reset-AzWebAppPublishingProfile ` | |
| -ResourceGroupName ${{ secrets.RESOURCE_GROUP_NAME }} ` | |
| -Name ${{ secrets.FUNCTION_APP_NAME }} | |
| $profile = "" |
So, the entire workflow for Azure Functions deployment is:
- Download the publish profile for the Azure Functions app,
- Deploy the Functions app using the publish profile, and
- Reset the publish profile for the Azure Functions app.
GitHub Action: Azure App Service Publish Profile
Those PowerShell script needs to be written every time you define a new workflow. But it would be great if there is GitHub Actions for it. Of course, there is. If you use this Azure App Service Publish Profile action, you can get the publish profile and reset it easily. Let's set up the workflow like below:
- Download the publish profile for the Azure Functions app (line #12-19),
- Deploy the Functions app using the publish profile (line #26), and
- Reset the publish profile for the Azure Functions app (line #28-35).
| name: Build, Test & Deploy | |
| on: push | |
| jobs: | |
| build_test_deploy: | |
| name: 'FunctionApp Build, Test & Deploy' | |
| runs-on: ubuntu-latest | |
| steps: | |
| - name: Checkout the repo | |
| uses: actions/checkout@v2 | |
| ... | |
| - name: Get FunctionApp publish profile | |
| id: publishprofile | |
| uses: aliencube/publish-profile-actions@v1 | |
| env: | |
| AZURE_CREDENTIALS: ${{ secrets.AZURE_CREDENTIALS_DEV }} | |
| with: | |
| resourceGroupName: ${{ secrets.RESOURCE_GROUP_NAME_DEV }} | |
| appName: ${{ secrets.RESOURCE_FUNCTIONAPP_NAME_DEV }} | |
| - name: Deploy FunctionApp | |
| uses: Azure/functions-action@v1 | |
| with: | |
| app-name: ${{ secrets.RESOURCE_FUNCTIONAPP_NAME_DEV }} | |
| package: published | |
| publish-profile: ${{ steps.publishprofile.outputs.profile }} | |
| - name: Reset FunctionApp publish profile | |
| uses: aliencube/publish-profile-actions@v1 | |
| env: | |
| AZURE_CREDENTIALS: ${{ secrets.AZURE_CREDENTIALS_DEV }} | |
| with: | |
| resourceGroupName: ${{ secrets.RESOURCE_GROUP_NAME_DEV }} | |
| appName: ${{ secrets.RESOURCE_FUNCTIONAPP_NAME_DEV }} | |
| reset: true |
With this action, we don't have to know the publish profile, but the workflow takes care of it. In addition to that, by any chance the publish profile is compromised, the last action always resets the profile. Therefore, the compromised one is no longer valid.
So far, we've walked through how we can deploy Azure Functions app through GitHub Actions, with no knowledge of the publish profile and reset the profile. I hope this approach would help build your CI/CD pipeline.