There's the tool called PublishToDev built by one of my colleagues, Todd, which schedules to publish articles on Dev.To. It's super useful because I can schedule my posts whenever I want to publish them on there. As soon as I saw this tool, I wanted to clone code in .NET because it would be beneficial to practice:
- Scraping web pages using either Puppeteer or Playwright,
- Using the Dev.To API,
- Handling the frontmatter programmatically, and
- Writing Azure Durable Functions
Let's walk through how I made it.
You can find the entire source codes of this application at this GitHub repository.
Web Pages Scraping
Once you write a blog post on Dev.To, you'll be able to get a preview URL before it publishing it. The preview URL has the format of https://dev.to/<username>/xxxx-****-temp-slug-xxxx?preview=xxxx. All you need to know from the preview page is to get the article ID found from the HTML element having the attribute of id="article-body".

According to the picture above, you can find the attribute of data-article-id. Its value is the very article ID.
Using either Puppeteer or Playwright to scrape a web page is super simple. Both have their own .NET ported versions like Puppeteer Sharp and Playwright Sharp respectively. However, they don't work on Azure Functions, unfortunately. More precisely, they work on your local dev environment, not on Azure instance. This post would be useful for your node.js Azure Functions app, but it's not that helpful for your .NET application. Let me find a way for it to work on Azure Functions instance correctly.
Therefore, I had to change the scraping method to be a traditional way, using HttpClient and regular expressions (line #1-2, 8).
| var pattern = "<div.+data-article-id=\"(\\d+)\"\\s*id=\"article-body\">"; | |
| var regex = new Regex(pattern, RegexOptions.Compiled | RegexOptions.IgnoreCase); | |
| var url = "https://dev.to/<username>/xxxx-****-temp-slug-xxxx?preview=xxxx"; | |
| var http = new HttpClient(); | |
| var html = await http.GetStringAsync(url); | |
| var match = regex.Match(html); | |
| var articleId = Convert.ToInt32(match.Groups[1].Value); |

You've got the article ID of your post. Let's move on.
Dev.To API Document – Open API
Dev.To is a blog platform for developer communities. Tens of blog posts with a broad range of development topics are published day by day. It also provides APIs to publish and manage blog posts. In other words, it has well documented APIs. Within the document page, you can also find the Open API document, which you will be able to build a wrapper SDK instantly.
Wrapper SDK Generation with AutoRest
As long as you've got an Open API document, generating an SDK is a piece of cake, using AutoRest. I created a .NET SDK by the following command. I set the namespace of Aliencube.Forem.DevTo and output directory of output. The last --v3 option indicates that the Open API document conforms to the v3 spec version.
| autorest --csharp \ | |
| --namespace="Aliencube.Forem.DevTo" \ | |
| --input-file=swagger.json \ | |
| --output-folder=output \ | |
| --v3 |
AutoRest does not only generate SDK in .NET but also in Go, Java, Python, node.js, TypeScript, Ruby and PHP. Therefore, you can generate the SDK with your desired language. The wrapper SDK repository can be found at:
https://github.com/aliencube/forem-sdk
Blog Post Markdown Document Download
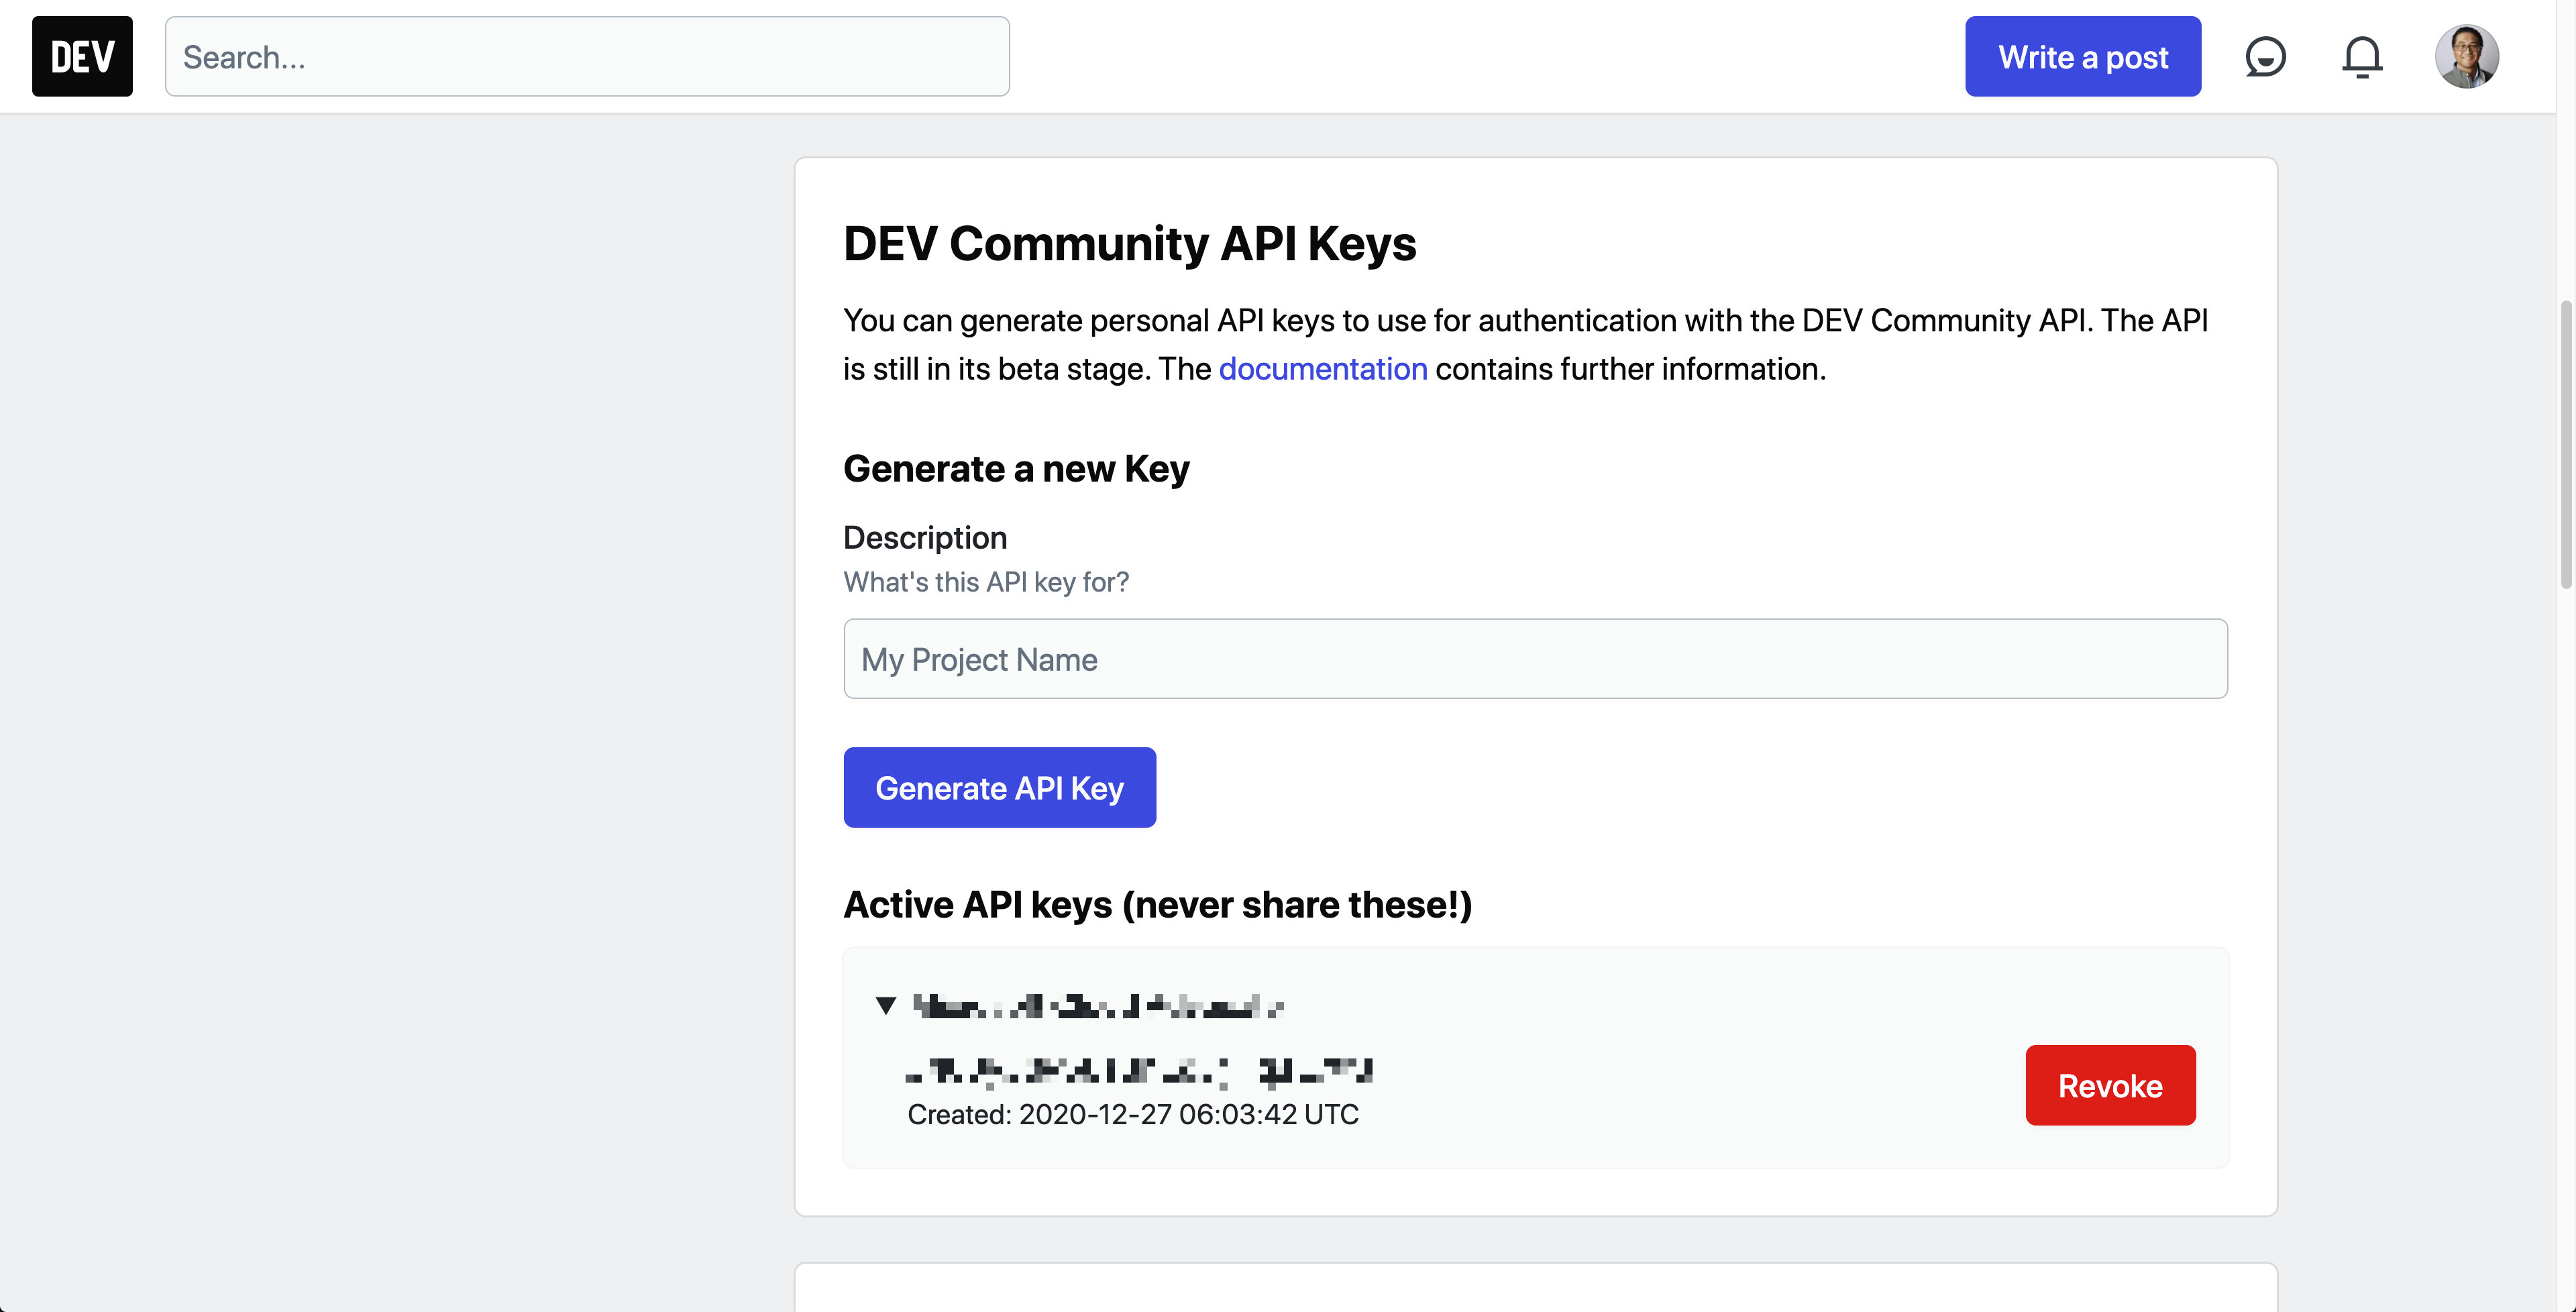
To use the API, you need to have an API key, of course. In the account settings page, generate a new API key.
Then, use the wrapper SDK generated above, and you'll get the markdown document (line #4-6).
| var http = new HttpClient(); | |
| http.DefaultRequestHeaders.Add("api-key", "<devto_api_key>"); | |
| var api = new DEVAPIbeta(http, false); | |
| var article = ((await api.GetUserUnpublishedArticlesAsync()) as IEnumerable<ArticleMe>) | |
| .SingleOrDefault(p => p.Id == articleId); | |
| var markdown = article.BodyMarkdown; |
Frontmatter Update
All the blog posts published to Dev.To contain metadata called frontmatter at the top of the markdown document. The frontmatter is written in YAML. Your blog post markdown might look like:
| --- | |
| title: xxxxx | |
| published: false | |
| cover_image: https://dev-to-uploads.s3.amazonaws.com/i/xxxxx.png | |
| description: xxxxx | |
| tags: xxx, yyy, zzz | |
| --- | |
| Blog Post Body |
In the frontmatter, you'll see the key/value pair of published: false. Updating this value to true and saving the post means that your blog post will be published. Therefore, all you need to do is to update that value in the frontmatter area. Have a look at the code below, which extracts the frontmatter from the markdown document.
| var segments = markdown.Split(new[] { "---" }, StringSplitOptions.RemoveEmptyEntries) | |
| .Select(p => p.Trim()); | |
| var frontmatter = segments.First(); | |
| var body = segments.Skip(1); |
The frontmatter string needs to be deserialised to a strongly-typed FrontMatter instance, using the YamlDotNet library. Then, change the Published value to true.
| var fm = new DeserializerBuilder() | |
| .WithNamingConvention(UnderscoredNamingConvention.Instance) | |
| .Build() | |
| .Deserialize<FrontMatter>(frontmatter); | |
| fm.Published = true; |
Once updated the frontmatter instance, serialise it again and concatenate it with the existing markdown body.
| frontmatter = new SerializerBuilder() | |
| .WithNamingConvention(UnderscoredNamingConvention.Instance) | |
| .Build() | |
| .Serialize(fm); | |
| var sb = new StringBuilder() | |
| .AppendLine("---") | |
| .AppendLine(frontmatter) | |
| .AppendLine("---") | |
| .AppendLine(body); | |
| markdown = sb.ToString(); |
Blog Post Markdown Document Update
Now, make another API call with this updated markdown document, and your post will be published.
| var updated = new ArticleUpdateArticle() { BodyMarkdown = markdown }; | |
| await api.UpdateArticleAsync(articleId, new ArticleUpdate(updated)); |
This is how your Dev.To blog post is published via their API. Let's move onto the scheduling part.
Azure Durable Functions for Scheduling
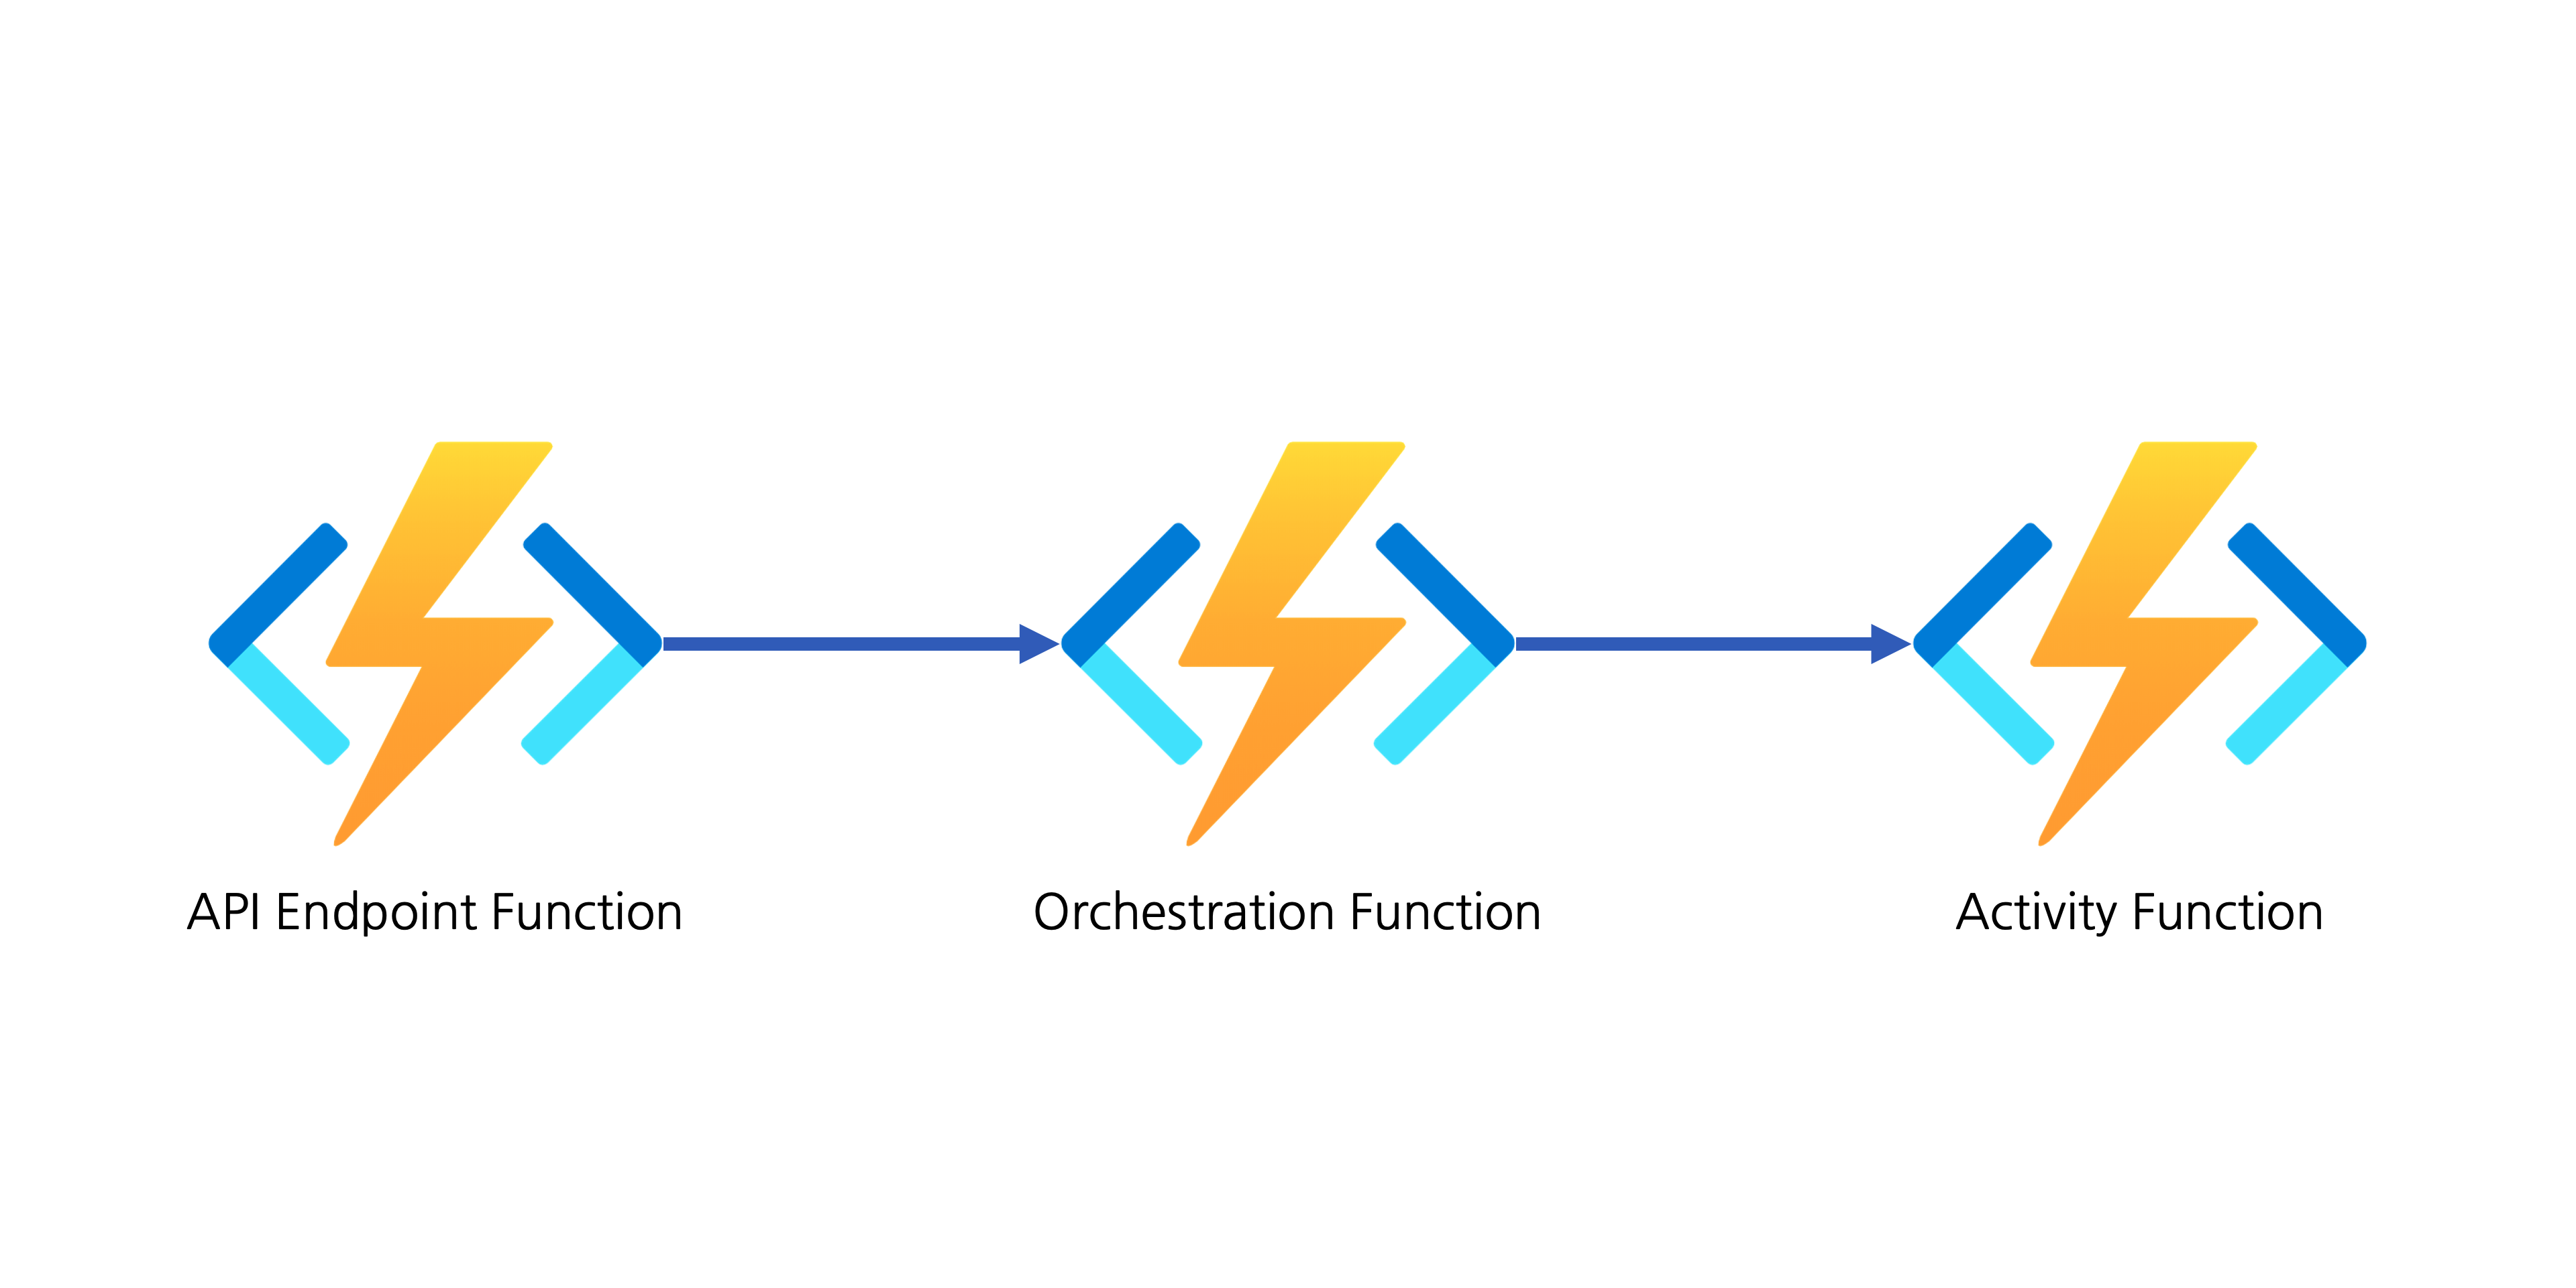
It's good to understand that Azure Durable Functions is a combination of three unit functions–API endpoint function or durable client function, orchestrator function and activity function. Each has its respective role in the following scenarios.
- The API endpoint function accepts the API requests. It then calls the orchestrator function to manage the entire workflow and returns a response with the 202 status code.
- The orchestrator function controls when and how activity functions are called, and aggregate states.
- Individual activity functions do their jobs and share the result with the orchestrator function.
The orchestrator function also includes the timer feature as one of the controlling methods for activity functions. With this timer, we can do the scheduling. In other words, we temporarily save the blog post at one time, then schedule to publish it by setting a timer.
API Endpoint Function
The endpoint function is the only type to be exposed outside. It's basically the same as the HTTP trigger function, but it has additional parameter with the durable function binding (line #4).
| [FunctionName(nameof(SchedulingHttpTrigger.SetScheduleAsync))] | |
| public async Task<IActionResult> SetScheduleAsync( | |
| [HttpTrigger(AuthorizationLevel.Function, "POST", Route = "orchestrators/schedules")] HttpRequest req, | |
| [DurableClient] IDurableOrchestrationClient starter, | |
| ILogger log) | |
| { | |
| ... |
What does it do, by the way?
-
The function accepts API requests from outside, with a request payload. In this post, the request payload looks like the following JSON object. The
schedulevalue should follow the ISO8601 format (eg.2021-01-20T07:30:00+09:00).This file contains bidirectional Unicode text that may be interpreted or compiled differently than what appears below. To review, open the file in an editor that reveals hidden Unicode characters. Learn more about bidirectional Unicode characters{ "previewUri": "https://dev.to/<username>/xxxx-****-temp-slug-xxxx?preview=xxxx", "schedule": "yyyy-MM-ddTHH:mm:sszzz" } -
Deserialise the request payload.
This file contains bidirectional Unicode text that may be interpreted or compiled differently than what appears below. To review, open the file in an editor that reveals hidden Unicode characters. Learn more about bidirectional Unicode charactersvar input = default(SchedulingRequest); using (var reader = new StreamReader(req.Body)) { var payload = await reader.ReadToEndAsync(); input = JsonConvert.DeserializeObject<SchedulingRequest>(payload); } -
Create a new orchestrator function and call it with the request payload.
This file contains bidirectional Unicode text that may be interpreted or compiled differently than what appears below. To review, open the file in an editor that reveals hidden Unicode characters. Learn more about bidirectional Unicode charactersvar instanceId = await starter.StartNewAsync( orchestratorFunctionName: orchestratorFunctionName, instanceId: null, input: input); -
As the orchestrator function works asynchronously, the endpoint function responds with the HTTP status code of 202.
This file contains bidirectional Unicode text that may be interpreted or compiled differently than what appears below. To review, open the file in an editor that reveals hidden Unicode characters. Learn more about bidirectional Unicode charactersreturn starter.CreateCheckStatusResponse(req, instanceId); }
Orchestrator Function
The orchestrator function takes care of the entire workflow. Here's the binding for the orchestrator function (line #3).
| [FunctionName(nameof(SchedulingOrchestrationTrigger.SetScheduleOrchestrationAsync))] | |
| public async Task<SchedulingResponse> SetScheduleOrchestrationAsync( | |
| [OrchestrationTrigger] IDurableOrchestrationContext orchestration, | |
| ILogger log) | |
| { | |
| ... |
IDurableOrchestrationContext instance knows the request payload passed from the endpoint function.
| var input = orchestration.GetInput<SchedulingRequest>(); |
Activate a timer, using the schedule from the request payload.
| var scheduled = input.Schedule.UtcDateTime; | |
| await orchestration.CreateTimer(scheduled, CancellationToken.None); |
Once the timer is activated, the orchestrator function is suspended until the timer expires. Once the timer expires, the orchestrator function resumes and calls the activity function.
| var activityFunctionName = nameof(SchedulingActivityTrigger.PublishArticleAsync); | |
| var output = await orchestration.CallActivityAsync<SchedulingResponse>(functionName: activityFunctionName, input: input); |
Finally, it returns the result aggregated from the activity function.
| return output; | |
| } |
Activity Function
While both endpoint function and orchestrator function do not look after the blog post itself, the activity function does all the things, including web page scraping, Dev.To API call and markdown document update. Here's the binding for the activity function (line #3).
| [FunctionName(nameof(SchedulingActivityTrigger.PublishArticleAsync))] | |
| public async Task<SchedulingResponse> PublishArticleAsync( | |
| [ActivityTrigger] SchedulingRequest input, | |
| ILogger log) | |
| { | |
| ... |
Add the codes for scraping, API call and markdown update mentioned above.
| // Web page scraping to get article ID | |
| ... | |
| // DevTo API call to get markdown document | |
| ... | |
| // Frontmatter update | |
| ... | |
| // DevTo API call to update markdown document | |
| ... |
And, it finally returns the result.
| var response = new SchedulingResponse() | |
| { | |
| Published = result, | |
| Message = $"Article published at {input.Schedule:yyyy-MM-ddTHH:mm:sszzzz}" | |
| }; | |
| return response; | |
| } |
So far, we've walked through implementing an Azure Durable Functions app to schedule to publish articles to the Dev.To platform. Throughout this, I think you've understood the core workflow of Azure Durable Functions–API request, orchestration and individual activities. The power of the Durable Functions is that it overcomes the limitations of stateless, by storing states. I hope you feel this power and convenience, too.