In my previous post, I discussed different containerising options for .NET developers. Now, let's slightly move the focus to Azure Functions app. How can you containerise the Azure Functions app? Fortunately, Azure Functions Core Tools natively support it with Dockerfile. But is the Dockerfile the only option for containerising your .NET-based Azure Functions apps? Throughout this post, I'm going to discuss how Azure Functions apps can be containerised both with and without Dockerfile.
You can find a sample code from this GitHub repository.
Prerequisites
There are a few prerequisites to containerise .NET apps effectively.
- .NET SDK 8.0+
- Azure Functions Core Tools
- Visual Studio or Visual Studio Code + C# Dev Kit + Azure Functions
- Docker Desktop
Containerise with Dockerfile
With the Azure Functions Core Tools, you can create a new Azure Functions app with the following command:
func init FunctionAppWithDockerfile \
    --worker-runtime dotnet-isolated \
    --docker \
    --target-framework net8.0
You may notice the --docker option in the command. This option creates a Dockerfile in the project directory. The Dockerfile looks like this:
FROM mcr.microsoft.com/dotnet/sdk:8.0 AS installer-env

COPY . /src/dotnet-function-app
RUN cd /src/dotnet-function-app && \
mkdir -p /home/site/wwwroot && \
dotnet publish *.csproj --output /home/site/wwwroot

# To enable ssh & remote debugging on app service change the base image to the one below
# FROM mcr.microsoft.com/azure-functions/dotnet-isolated:4-dotnet-isolated8.0-appservice
FROM mcr.microsoft.com/azure-functions/dotnet-isolated:4-dotnet-isolated8.0
ENV AzureWebJobsScriptRoot=/home/site/wwwroot \
    AzureFunctionsJobHost__Logging__Console__IsEnabled=true

COPY --from=installer-env ["/home/site/wwwroot", "/home/site/wwwroot"]
There are a few points on Dockerfile to pick up:
- The base image for the runtime is
mcr.microsoft.com/azure-functions/dotnet-isolated:4-dotnet-isolated8.0. There are two other options available,mcr.microsoft.com/azure-functions/dotnet-isolated:4-dotnet-isolated8.0-slimandmcr.microsoft.com/azure-functions/dotnet-isolated:4-dotnet-isolated8.0-mariner. You can choose one of them based on your requirements. - The function app is running on the
/home/site/wwwrootdirectory. - It has two environment variables,
AzureWebJobsScriptRootandAzureFunctionsJobHost__Logging__Console__IsEnabled. - There's no
ENTRYPOINTinstruction defined.
These points will be used later on this post.
Let's add a new function to the Azure Functions app with the following command:
func new -n HttpExampleTrigger -t HttpTrigger -a anonymousOnce it's added, open the HttpExampleTrigger.cs file and modify it as follows:
// Before
return new OkObjectResult("Welcome to Azure Functions!");

// After
return new OkObjectResult("Welcome to Azure Functions with Dockerfile!");
Now, you can build the container image with the following command:
docker build . -t funcapp:latest-dockerfileYou have the container image for the Azure Functions app. You can run the container with the following command:
docker run -d -p 7071:80 --name funcappdockerfile funcapp:latest-dockerfileYour function app is now up and running in a container. Open the browser and navigate to http://localhost:7071/api/HttpExampleTrigger to see the function app running.
Open your Docker Desktop and check the running container.
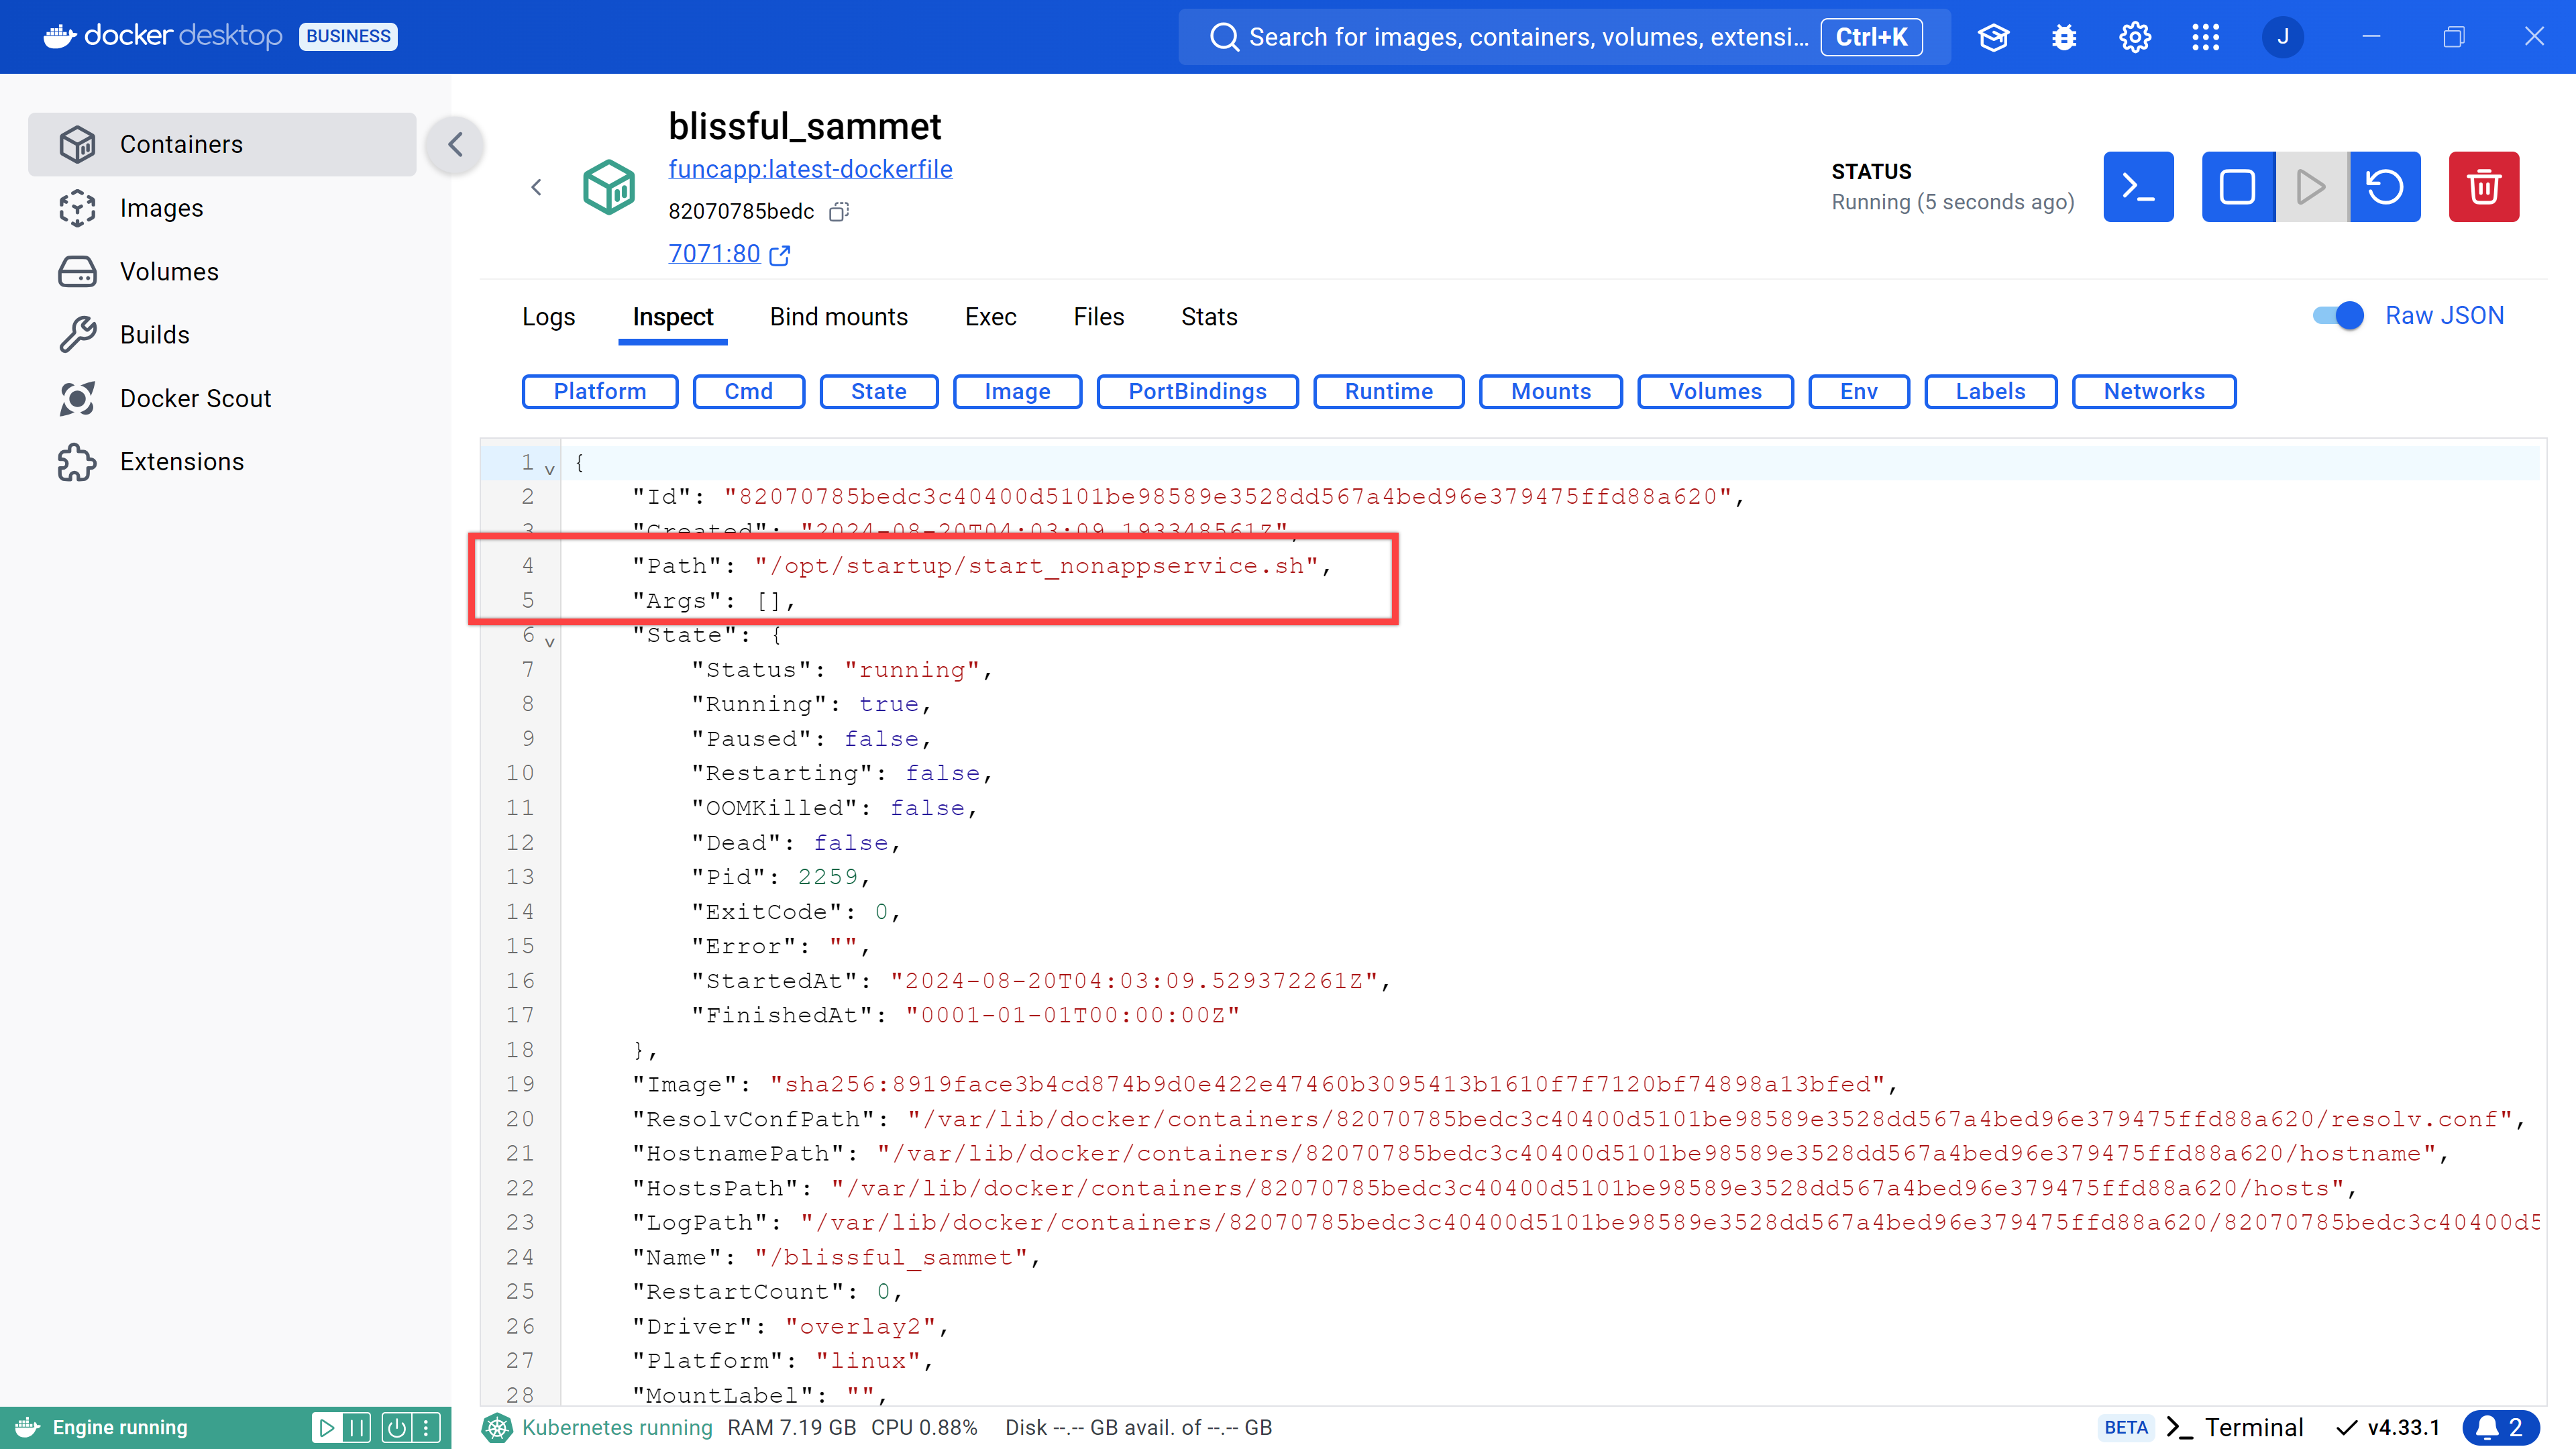
Can you see the Path and Args value? The Path value is /opt/startup/start_nonappservice.sh and the Args value is an empty array. In other words, the shell script, start_nonappservice is run when the container starts, and it takes no arguments. Keep this information in mind. You'll use it later in this post.
Once you're done, stop and remove the container with the following commands:
docker stop funcappdockerfile && docker rm funcappdockerfileSo far, we've containerised the Azure Functions app with the Dockerfile. But, as I mentioned before, there is another way to containerise the Azure Functions app without having Dockerfile. Let's move on.
Containerise with dotnet publish
Because MSBuild natively supports containerisation, you can make use of the dotnet publish command to build the container image for your function app. If you want to dynamically set the base container image, this option will be really useful. To do this, you might need to update your .csproj file to include the containerisation settings. First of all, create a new function app without the --docker option.
func init FunctionAppWithMSBuild \
    --worker-runtime dotnet-isolated \
    --target-framework net8.0
Let's add a new function to the Azure Functions app with the following command:
func new -n HttpExampleTrigger -t HttpTrigger -a anonymousOnce it's added, open the HttpExampleTrigger.cs file and modify it as follows:
// Before
return new OkObjectResult("Welcome to Azure Functions!");

// After
return new OkObjectResult("Welcome to Azure Functions with MSBuild!");
Now, the fun part begins. Open the FunctionAppWithMSBuild.csproj file and add the following node:
<ItemGroup>
  <ContainerEnvironmentVariable
      Include="AzureWebJobsScriptRoot" Value="/home/site/wwwroot" />
  <ContainerEnvironmentVariable
      Include="AzureFunctionsJobHost__Logging__Console__IsEnabled" Value="true" />
</ItemGroup>
Did you find that these two environment variables are the same as the ones in the Dockerfile? Let's add another node to the .csproj file:
<ItemGroup Label="ContainerAppCommand Assignment">
  <ContainerAppCommand Include="/opt/startup/start_nonappservice.sh" />
</ItemGroup>
This node specifies the command to run when the container starts. This is the same as the Path value in the Docker Desktop screenshot. Now, you can build the container image with the following command:
dotnet publish ./FunctionAppWithMSBuild \
    -t:PublishContainer \
    --os linux --arch x64 \
    -p:ContainerBaseImage=mcr.microsoft.com/azure-functions/dotnet-isolated:4-dotnet-isolated8.0 \
    -p:ContainerRepository=funcapp \
    -p:ContainerImageTag=latest-msbuild \
-p:ContainerWorkingDirectory="/home/site/wwwroot"NOTE: You can set the base container image with
mcr.microsoft.com/azure-functions/dotnet-isolated:4-dotnet-isolated8.0-slimormcr.microsoft.com/azure-functions/dotnet-isolated:4-dotnet-isolated8.0-mariner, depending on your requirements.
This command takes four properties – ContainerBaseImage, ContainerRepository, ContainerImageTag, and ContainerWorkingDirectory. With this dotnet publish command, you have the same development experience as building the container image with the docker build command, without having to rely on Dockerfile.
Run the following command to run the container:
docker run -d -p 7071:80 --name funcappmsbuild funcapp:latest-msbuildYour function app is now up and running in a container. Open the browser and navigate to http://localhost:7071/api/HttpExampleTrigger to see the function app running.
Open your Docker Desktop and check the running container.
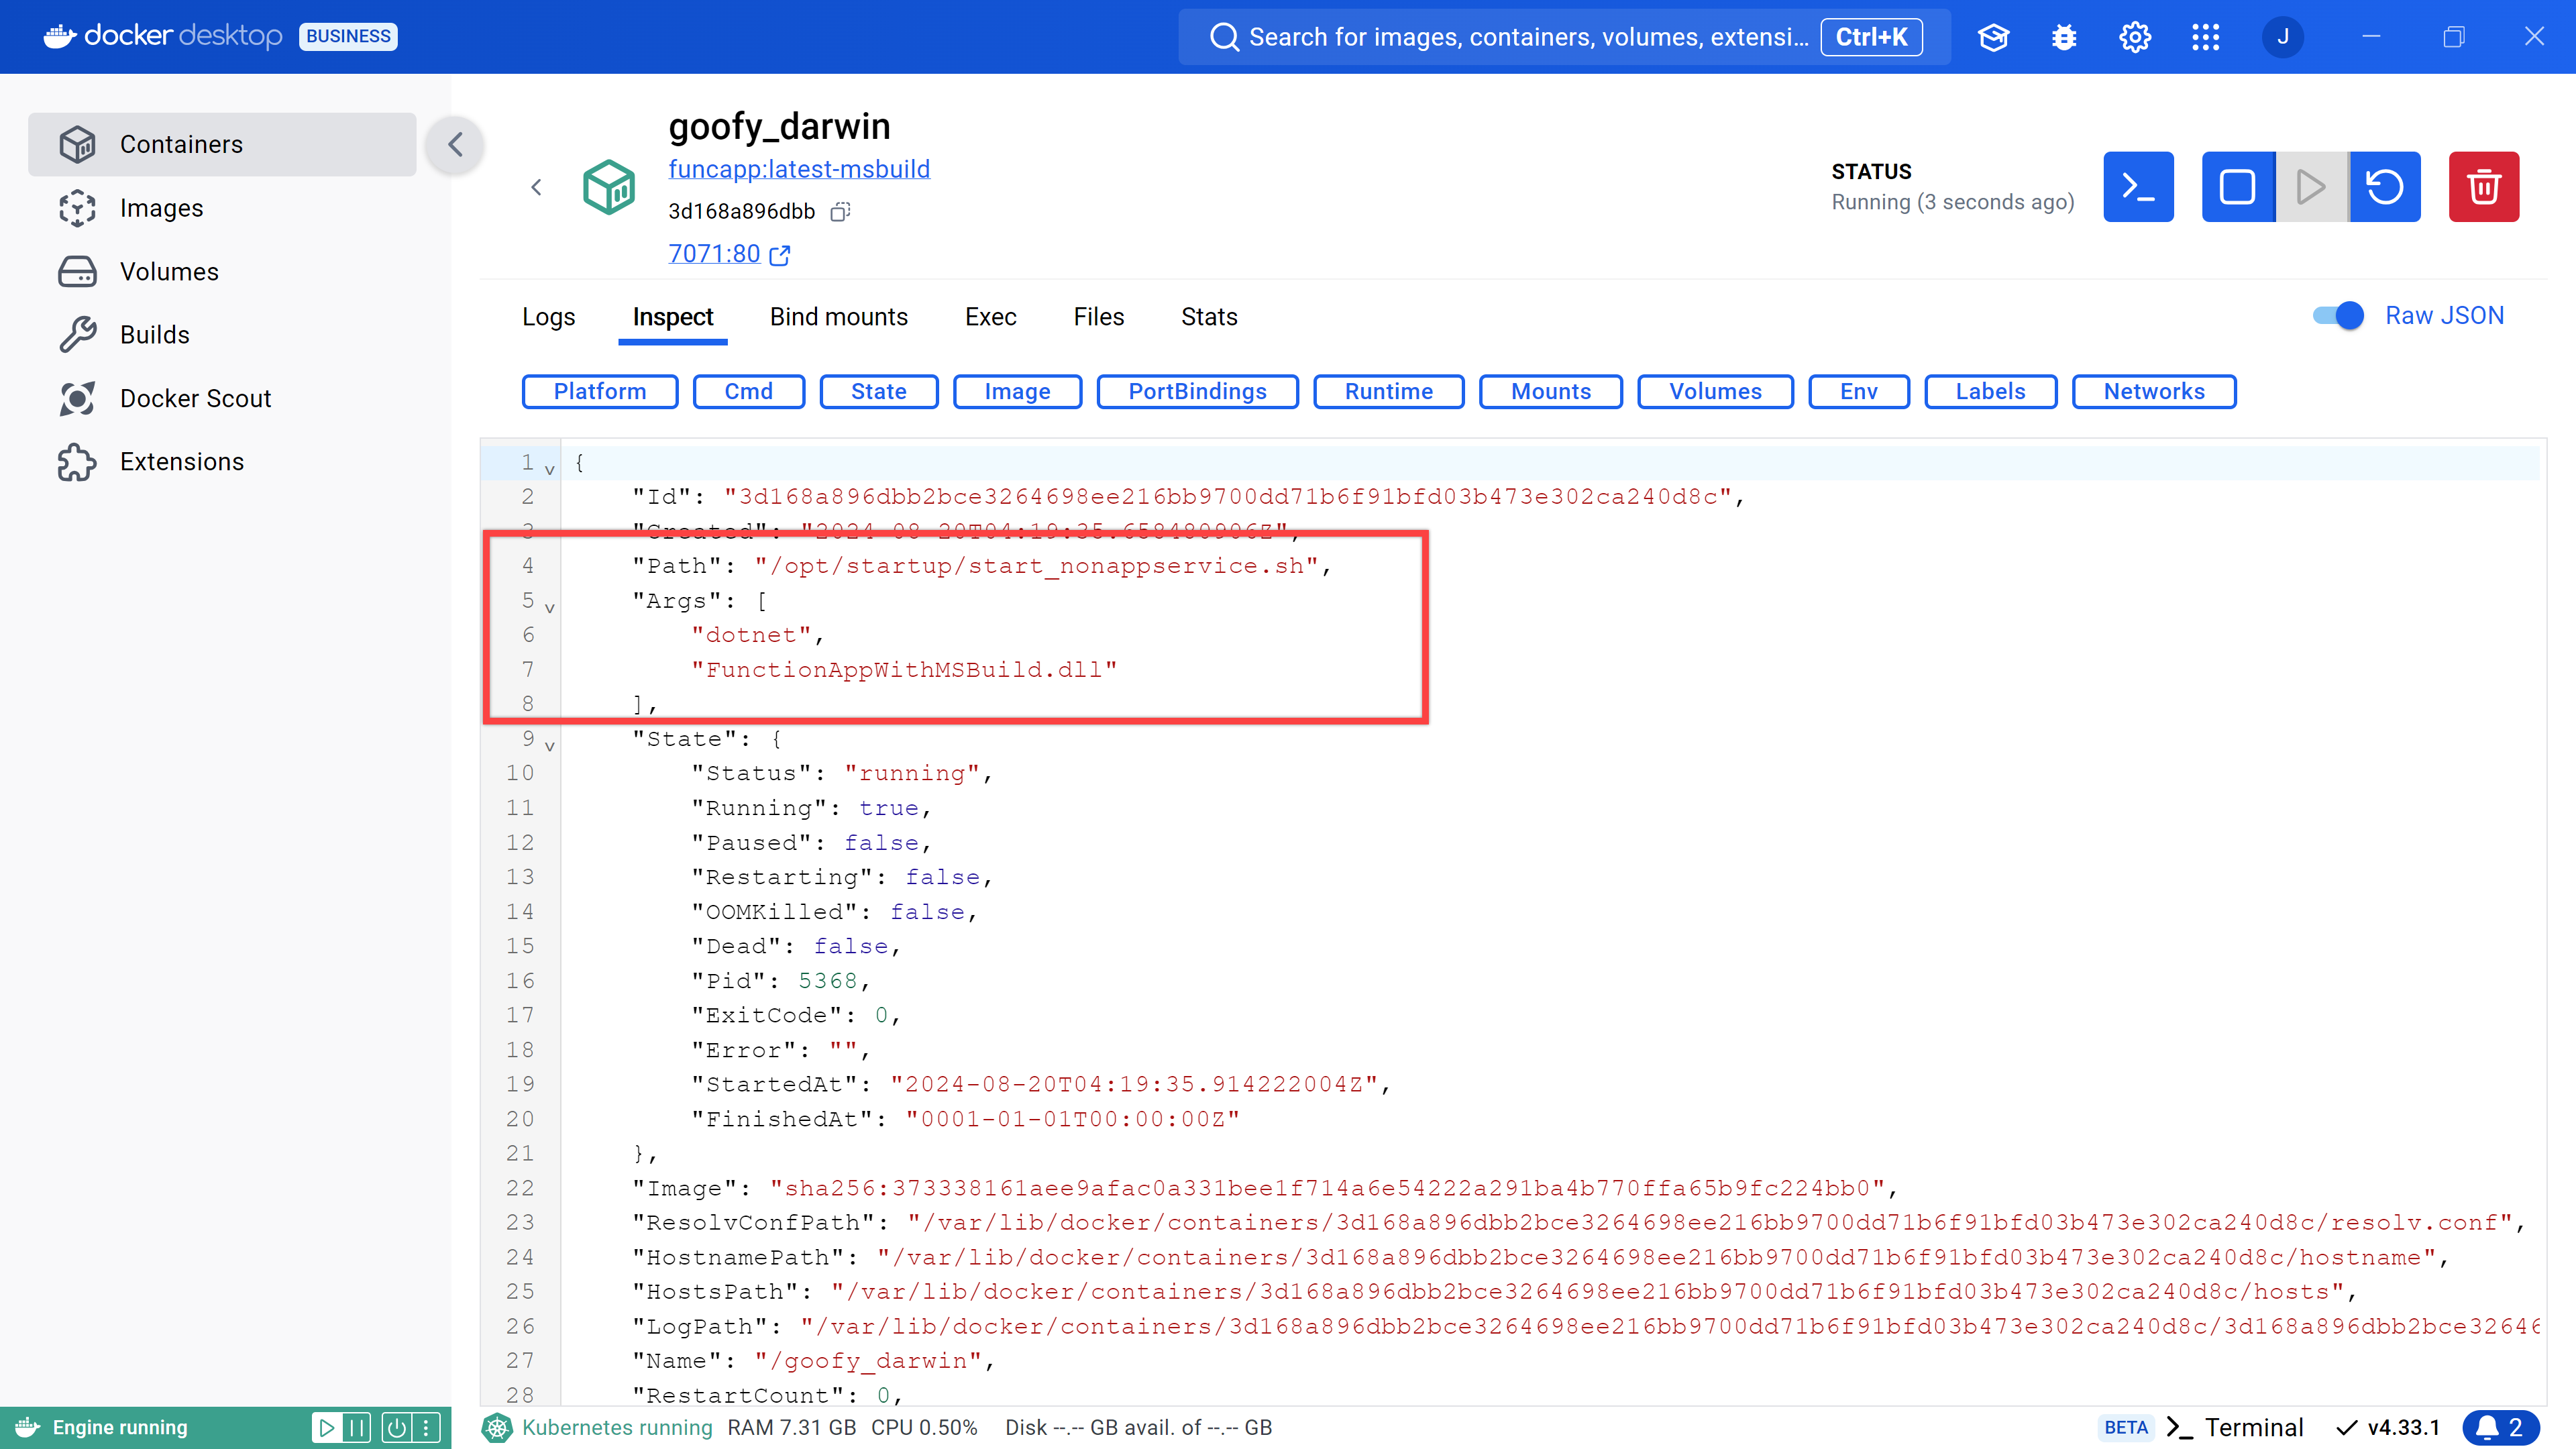
Can you see the Path and Args value? The Path value is /opt/startup/start_nonappservice.sh and the Args value has dotnet and FunctionAppWithMSBuild.dll. But these arguments are ignored because the shell script doesn't take any argument.
Once you're done, stop and remove the container with the following commands:
docker stop funcappmsbuild && docker rm funcappmsbuildNow, you've got the Azure Functions app containerised without Dockerfile. With this dotnet publish approach, you can easily change the base container image, repository, tag, and working directory without relying on Dockerfile.
So far, I've walked through how .NET developers can containerise their .NET-based Azure Functions apps with two different options. You can either write Dockerfiles or use dotnet publish to build container images. Which one do you prefer?
More about MSBuild for Containers?
If you want to learn more options about containers with MSBuild, the following links might be helpful.