When working with web applications, implementing authentication and authorization is crucial for security. Traditionally, there have been various ways from simple username/password inputs to OAuth-based approaches. However, implementing authentication and authorization logics can be quite complex and challenging.
Fortunately, Azure offers a feature called EasyAuth, which simplifies this process. EasyAuth is built in Azure PaaS services like App Service, Functions, Container Apps, and Static Web Apps. The best part of using EasyAuth is that you don't have to modify existing code for the EasyAuth integration.
Having said that, since EasyAuth follows one of the cloud architecture patterns – Sidecar pattern, it secures the entire web application. However, fine-tuned control – such as protecting only specific areas or excluding certain parts – can be tricky to achieve.
To address this limitation, the developer community has explored various solutions:
- EasyAuth for App Service by Maxime Rouiller
- EasyAuth for Azure Container Apps by John Reilly
- EasyAuth for Azure Static Web Apps by Anthony Chu
These approaches are still valid today but require updates to align with the latest .NET features.
Throughout this post, I'm going to explore how to transform the authentication token generated by EasyAuth in Azure App Service and Azure Container Apps into a format usable by Blazor and other ASP.NET Core web applications.
Please refer to the previous post about EasyAuth on Azure Static Web Apps.
Download NuGet Package
A few NuGet packages are available for ASP.NET Core web applications to integrate the Client Principal token generated by EasyAuth. Currently, the packages support Microsoft Entra ID and GitHub OAuth.
NOTE: These packages are not the Microsoft official ones. Therefore, use these packages with your own care.
| Package | Version | Downloads |
|---|---|---|
| Aliencube.Azure.Extensions.EasyAuth |  |
 |
| Aliencube.Azure.Extensions.EasyAuth.EntraID |  |
 |
| Aliencube.Azure.Extensions.EasyAuth.GitHub |  |
 |
You can find the source code of these NuGet packages on this GitHub repository.
Getting Started with Azure Developer CLI
The NuGet package repository has sample apps for you to deploy ASP.NET Core web apps to both Azure App Service and Azure Container Apps.
- Clone the repository.
- Make sure you have the latest version of Azure CLI, Azure Bicep CLI and Azure Developer CLI.
- Login to Azure by running the
azd auth logincommand. - Deploy the sample apps by running
azd upcommand. You might be asked to provide both Client ID and Client Secret values of a GitHub OAuth app. If you don't have it, leave them blank.
Apply NuGet Package to Web App
The example uses a Blazor web app, but the same approach applies to any ASP.NET Core web application.
Microsoft Entra ID
-
Add the NuGet package to your Blazor application.
dotnet add package Aliencube.Azure.Extensions.EasyAuth.EntraIDNOTE: At the time of writing, it's still in preview. Therefore, use the
--prereleasetag at the end of the command likedotnet add package Aliencube.Azure.Extensions.EasyAuth.EntraID --prerelease. -
Open the
Program.csfile and find the code line,var app = builder.Build();. Then, add dependencies for authentication and authorisation.// 👇👇👇 Add dependencies for authentication/authorisation builder.Services.AddAuthentication(EasyAuthAuthenticationScheme.Name) .AddAzureEasyAuthHandler<EntraIDEasyAuthAuthenticationHandler>(); builder.Services.AddAuthorization(); // 👆👆👆 Add dependencies for authentication/authorisation var app = builder.Build(); -
In the same
Program.csfile and find the code line,app.Run();. Then activate authentication and authorisation.// 👇👇👇 Activate authentication/authorisation app.UseAuthentication(); app.UseAuthorization(); // 👆👆👆 Activate authentication/authorisation app.Run(); -
Apply the
Authorizeattribute to a specific page component.@page "/random-page-url" @* 👇👇👇 Apply authorisation *@ @using Aliencube.Azure.Extensions.EasyAuth @using Microsoft.AspNetCore.Authorization @attribute [Authorize(AuthenticationSchemes = EasyAuthAuthenticationScheme.Name)] @* 👆👆👆 Apply authorisation *@ - Deploy the app to either Azure App Service or Azure Container Apps.
-
After deployment, configure the authentication settings like:
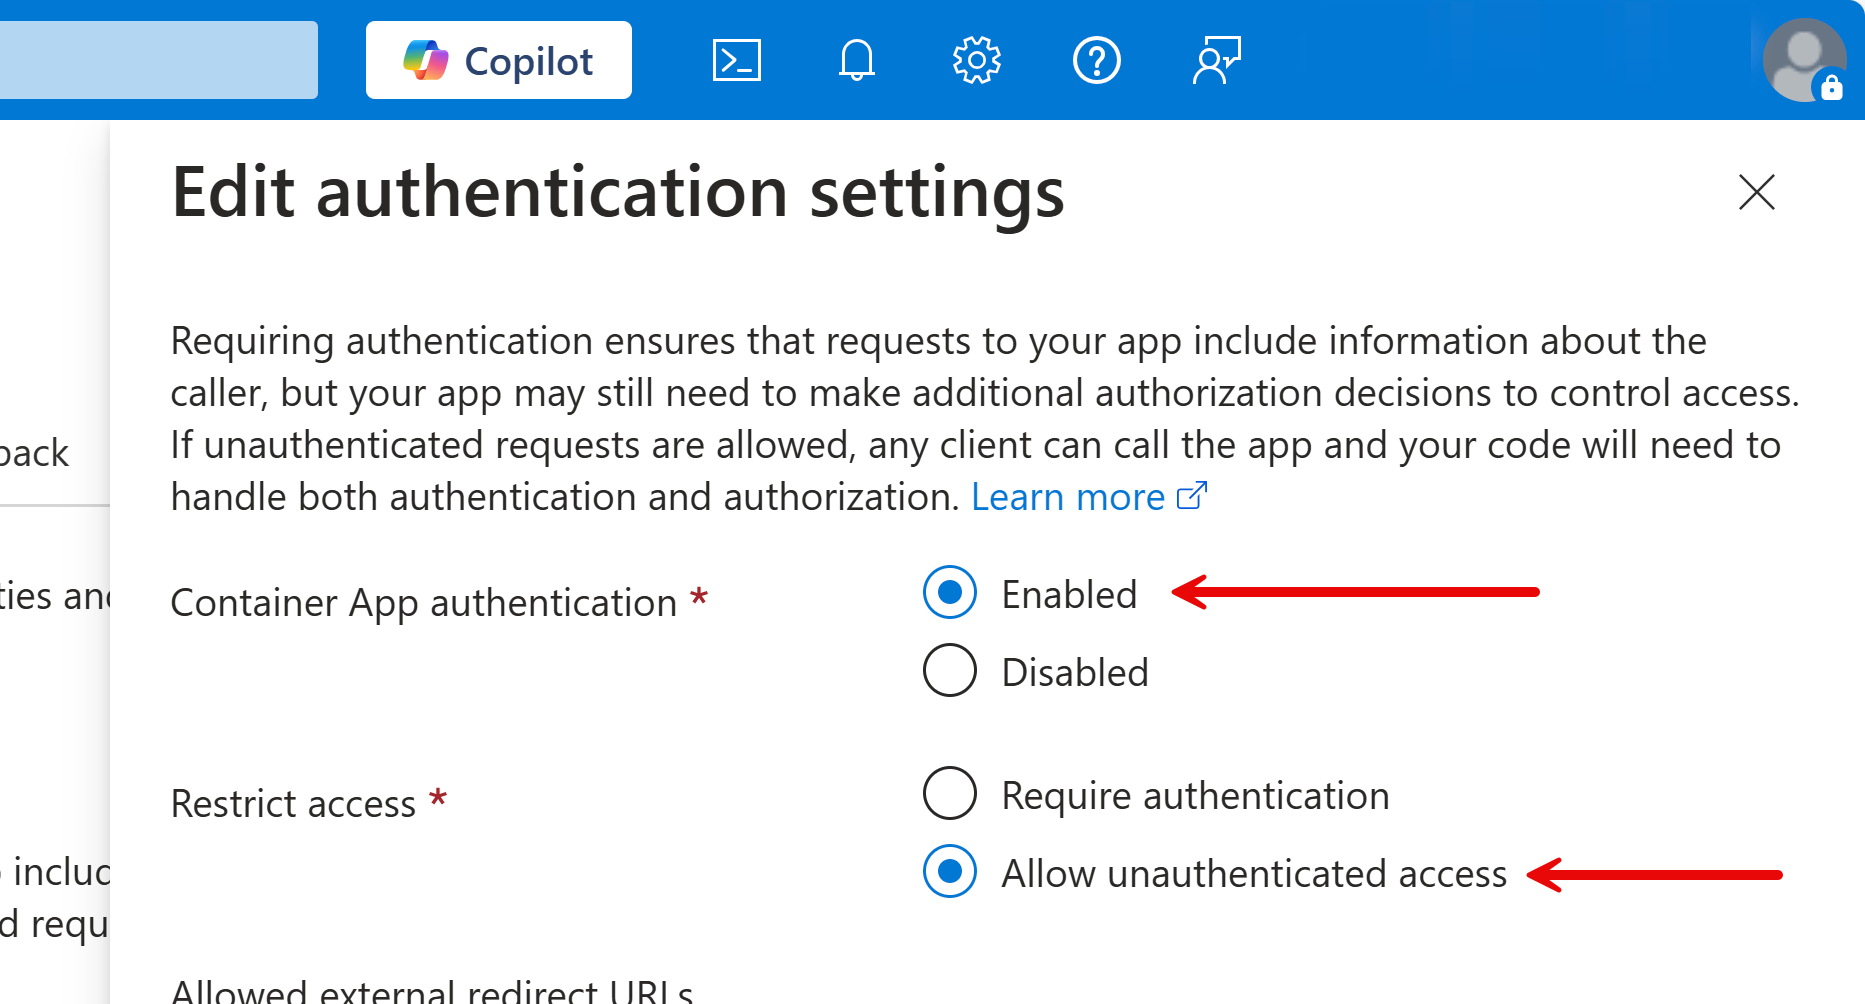
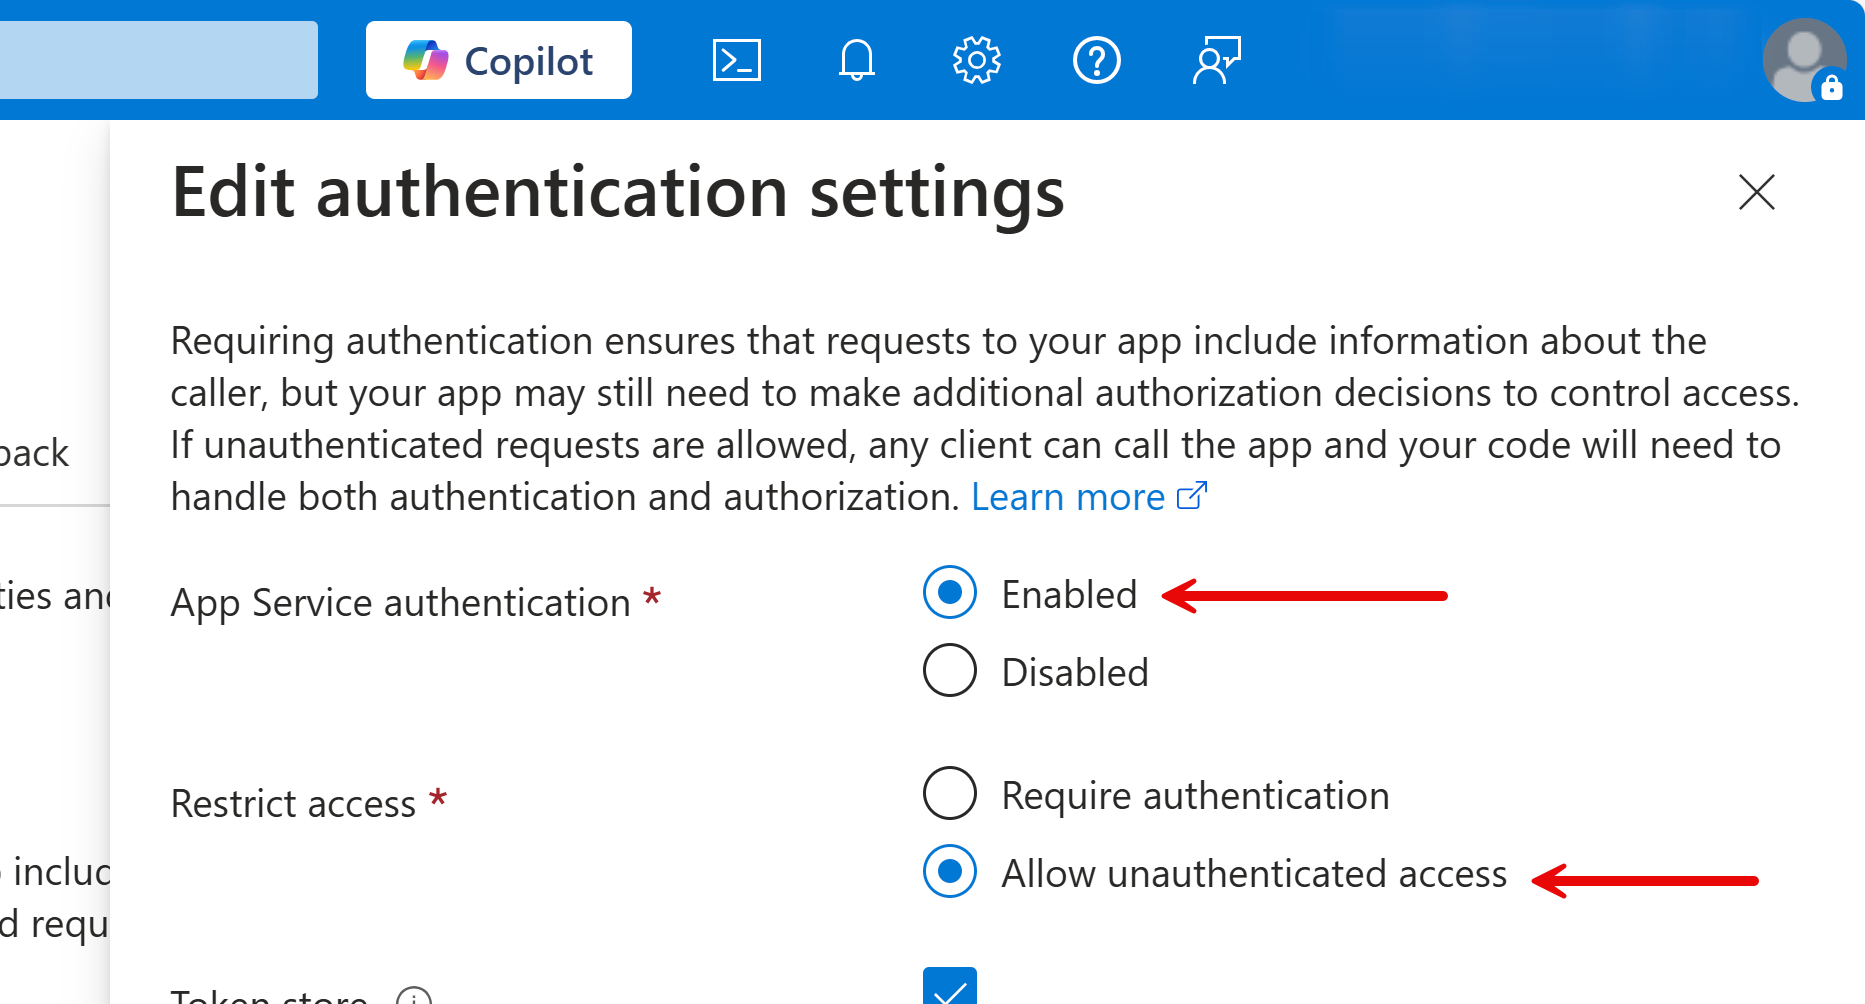
- Open your web browser and navigate the page component you applied authorisation, and see the 401 (Unauthorized) error.
- Sign into the web app through
/.auth/login/aadand visite the page again, and verify you're able to see the content on that page.
GitHub OAuth
It's mostly the same as using Microsoft Entra ID, except using a different NuGet package.
-
Install the GitHub-specific NuGet package.
dotnet add package Aliencube.Azure.Extensions.EasyAuth.GitHubNOTE: At the time of writing, it's still in preview. Therefore, use the
--prereleasetag at the end of the command likedotnet add package Aliencube.Azure.Extensions.EasyAuth.GitHub --prerelease. -
Open the
Program.csfile and find the code line,var app = builder.Build();. Then, add dependencies for authentication and authorisation. Make sure this time you useGitHubEasyAuthAuthenticationHandlerinstead ofEntraIDEasyAuthAuthenticationHandler.// 👇👇👇 Add dependencies for authentication/authorisation builder.Services.AddAuthentication(EasyAuthAuthenticationScheme.Name) .AddAzureEasyAuthHandler<GitHubEasyAuthAuthenticationHandler>(); builder.Services.AddAuthorization(); // 👆👆👆 Add dependencies for authentication/authorisation var app = builder.Build(); - Follow the same steps as above.
How Does It Work?
When authenticated through Azure EasyAuth, a request header X-MS-CLIENT-PRINCIPAL is created. It contains a base-64 encoded JSON object, which needs to be decoded and transformed into a ClaimsPrincipal instance for role-based access control.
Here's the JSON object. For brevity, most claims are omitted except two. Here's the JSON object generated from Microsoft Entra ID authentication.
{
  "auth_typ": "aad",
  "name_typ": "http://schemas.xmlsoap.org/ws/2005/05/identity/claims/emailaddress",
  "role_typ": "http://schemas.microsoft.com/ws/2008/06/identity/claims/role",
  "claims": [
    {
      "typ": "http://schemas.xmlsoap.org/ws/2005/05/identity/claims/emailaddress",
      "val": "john.doe@contoso.com"
    },
    {
      "typ": "roles",
      "val": "User"
    }
  ]
}
And, here's the JSON object generated from GitHub authentication.
{
  "auth_typ": "github",
  "name_typ": "http://schemas.xmlsoap.org/ws/2005/05/identity/claims/name",
  "role_typ": "http://schemas.microsoft.com/ws/2008/06/identity/claims/role",
  "claims": [
    {
      "typ": "http://schemas.xmlsoap.org/ws/2005/05/identity/claims/name",
      "val": "John Doe"
    },
    {
      "typ": "urn:github:type",
      "val": "User"
    }
  ]
}
This JSON object should be converted into the ClaimsPrincipal instance for granular control on each page.
Let's understand the JSON object.
auth_typ: It indicates the authentication method currently used. For example, Microsoft Entra ID saysaadand GitHub saysgithub.name_typ: After the authentication, the claim with this key is bound toHttpContext.User.Identity.Name.role_typ: They claim key for authorisation by roles.claims: A collection of claims generated by either Microsoft Entra ID or GitHub.
But the challenge on the X-MS-CLIENT-PRINCIPAL token is that it has no role claims matching to the role_typ key. The Entra ID one contains the roles claim and GitHub one contains the urn:github:type claim, which is not following the OpenID Connect standard, while ClaimsPrincipal object on ASP.NET Core web apps do follow the standard. The NuGet packages above convert the role values.
By adding and activating the conversion handler, users are now able to login to the web app with EasyAuth and access to certain pages with proper permissions. Here's the example that uses the AuthenticationSchemes property to let users access to pages as long as they sign in with EasyAuth.
@page "/random-page-url"

@attribute [Authorize(AuthenticationSchemes = EasyAuthAuthenticationScheme.Name)]
This is another example that uses the Roles property to let users having the User permission to access to the given page.
@page "/random-page-url"

@attribute [Authorize(Roles = "User")]NOTE: Make sure that
X-MS-CLIENT-PRINCIPALtoken from Microsoft Entra ID doesn't contain therolesclaims out-of-the-box because it really depends on each tenant's policy.
Roadmap
Azure EasyAuth supports multiple identity providers, but the NuGet packages currently support Microsoft Entra ID and GitHub OAuth.
- ✅ Microsoft Entra ID
- ✅ GitHub
- ⏹️ OpenID Connect
- ⏹️ X
- ⏹️ Apple
Contributions are always welcome!
So far, we've walked through how to transform Azure EasyAuth authentication token to the ClaimsPrincipal object to be used within ASP.NET Core web apps. With these packages, you can control individual pages based on the users' role and increase apps' security with less efforts.
Learn More
For further details on Azure EasyAuth, check out: