This post discusses the whole process that migrates existing Wordpress websites to gridsome based on vue.js, deploys them to Netlify through GitHub Actions.
Why Migration?
There's no doubt that Wordpress is one of the most well-known and well-made blog publishing tools in the world. However, I have to deploy it to somewhere and maintain it. It's OK unless any issue is coming up, which make our lives harder. Wordpress has continuously evolved so that it automatically updates its core, plugins and themes, but it sometimes stops working without knowing it. We also want to avoid our maintenance efforts as much as possible, including website and database. On the other hands, hosted Wordpress is really handy because we don't have to care for most things. But it becomes costly if we need to add custom domains, SSL certificates, custom plugins and custom themes.
Because of these issues, I've been looking for alternatives using static site generators such as Jekyll, Hexo and Hugo, but none of them was satisfying. Then I found Gatsby based on React. As I've never used React before, although it looks very promising, I didn't even start taking a look. Instead, I looked for another tool based on vue.js that I used to build some web apps before, and ola! found gridsome! So, I played around this tool and wrote this blog post and this post. And finally, I decided to use gridsome for my migration.
Why GitHub Actions?
Instead of Azure DevOps, I chose GitHub Actions because I don't have to leave GitHub to build and publish. If I select Azure DevOps, I have to create an instance, followed by creating a project and configuring it. Too much work for my simple blog hosting. Additionally, the fact that GitHub Actions is a fork of Azure Pipelines is appealing to me, and it's modified easier for us to use. And the runners for GitHub Actions are running on Azure. Why not using it then?
If there is no GitHub Actions, I would definitely go for Azure DevOps, because it gives the best user experience as a serviced and free service supporting open source projects.
Why Netlify?
Azure Blob Storage for static website hosting feature was my first consideration in the first place. However, one blob storage can host only one static website. I'm hosting three websites – justinchronicles.net, aliencube.org and devkimchi.com. One blob storage for three websites is not possible. In addition to this, after the custom domain configuration, to use HTTPS connection, I have to use Azure CDN or something similar extra work is required, which I wanted to avoid. Therefore, Netlify has become my choice.
Converting Wordpress Posts
XML Export
Wordpress doesn't support markdown export out-of-the-box. There are third-party plugins for it, but not working as my expectations. Therefore, I just exported all posts using the built-in export feature. I've now got the XML file, and I needed it to be converted to markdown.
Markdown Conversion
This took most of my migration time and efforts. First of all, I used wordpress-export-to-markdown to convert the XML file to markdown files. But the result markdown files didn't have enough front-matter details, so I had to open every sing file to update each front-matter. As Jekyll's front-matter has been widely adopted to other static site generators, including gridsome, it wasn't that difficult. It was just a matter of time for conversion.
The front-matter after the markdown conversion from XML looks like this:
| --- | |
| title: "Cloud Service Lock-in Guidelines from UK Government" | |
| date: "2019-12-31" | |
| --- |
But the default front-matter generated by gridsome has more attributes:
| --- | |
| title: "Post Title" | |
| slug: post-unique-slug | |
| description: "Post description" | |
| date: "2020-01-03" | |
| author: Justin-Yoo | |
| tags: | |
| cover: | |
| fullscreen: false | |
| --- |
Therefore, except title and date, every other attribute were manually updated. As there were a relatively small number of posts, it didn't take too much, but I wouldn't do it again. Anyway, I completed all the markdown conversion. Yay! Nearly there.
Preparing Gridsome Blog Theme
gridsome offers many official and third-party starters. I chose Bleda because it basically includes many other plugins out-of-the-box.
Preparing Gridsome Plugins
As mentioned earlier, the starter contains almost everything I needed, except...
gridsome-plugin-remark-embed
This plugin is to embed social media for Twitter, YouTube and GitHub gist. However, as it has a bug on the gist embedding script, I raised a PR to fix the bug and have been waiting for the official release. Instead, while I'm waiting for the official release, I locally copied the updated script so that it can be used later on in the GitHub Actions.
vue-disqus
This plugin is to add comment feature. I've already been using Disqus for a while and reviewing whether I keep using it or not after the migration. But as I've already got many valuable comments there, I decided to keep it for now.
Configuring Gridsome
Metadata Configuration
All metadata, including the favicon, were updated for my blog settings.
| ... | |
| module.exports = { | |
| siteName: 'Dev Kimchi', | |
| siteDescription: "Fermentation: Turning .NET, Web and Cloud into Something", | |
| siteUrl: 'https://devkimchi.com', | |
| titleTemplate: `%s | DevKimchi`, | |
| icon: 'src/favicon.png', | |
| ... |
Permalink Configuration
To keep the existing Wordpress permalink structure, gridsome.config.js updated the permalink settings.
| ... | |
| templates: { | |
| //Post: '/:title', | |
| Post: '/:year/:month/:day/:slug', | |
| Tag: '/tag/:id', | |
| Author: '/author/:id', | |
| }, | |
| ... |
Also, the RSS feed URL has been updated.
| ... | |
| { | |
| use: 'gridsome-plugin-rss', | |
| options: { | |
| ... | |
| feedItemOptions: node => ({ | |
| title: node.title, | |
| description: node.description, | |
| //url: 'https://devkimchi.com' + node.slug, | |
| url: 'https://devkimchi.com' + node.path, | |
| author: node.author, | |
| date: node.date, | |
| }), | |
| ... | |
| }, | |
| }, | |
| ... |
GitHub Gist Style Configuration
The following stylesheet has been added to src/main.js to follow the GitHub gist style.
| ... | |
| head.link.push({ | |
| rel: 'stylesheet', | |
| href: 'https://github.githubassets.com/assets/gist-embed-d89dc96f3ab6372bb73ee45cafdd0711.css' | |
| }) | |
| ... |
Cover Image Configuration
The original starter doesn't show the cover images on the list page. I changed /src/components/PostItem.vue to display the cover images.
| ... | |
| <header class="text-center mb-8"> | |
| <div v-if="post.cover"> | |
| <g-link :to="`${post.path}/`" class="text-black font-bold"><img :src="`${post.cover}`" /></g-link> | |
| </div> | |
| <time :datetime="post.datetime" class="text-gray-700 text-xs mb-2 uppercase">{{ formatPublishDate(post.datetime) }}</time> | |
| ... |
And this also needs the GraphQL query updated. Both /src/templates/Author.vue and /src/templates/Tag.vue have been updated.
| ... | |
| edges { | |
| node { | |
| ...on Post { | |
| id | |
| title | |
| datetime: date (format: "YYYY-MM-DD HH:mm:ss") | |
| path | |
| content | |
| excerpt | |
| description | |
| timeToRead | |
| cover | |
| tags { | |
| id | |
| title | |
| path | |
| } | |
| } | |
| } | |
| } | |
| ... |
All the settings on gridsome have been completed.
Preparing Netlify Instance
We need an instance on Netlify for static website hosting. We can directly integrate GitHub with Netlify for it, but we're going to use GitHub Actions. Therefore, we create an instance manually, by dropping any file.

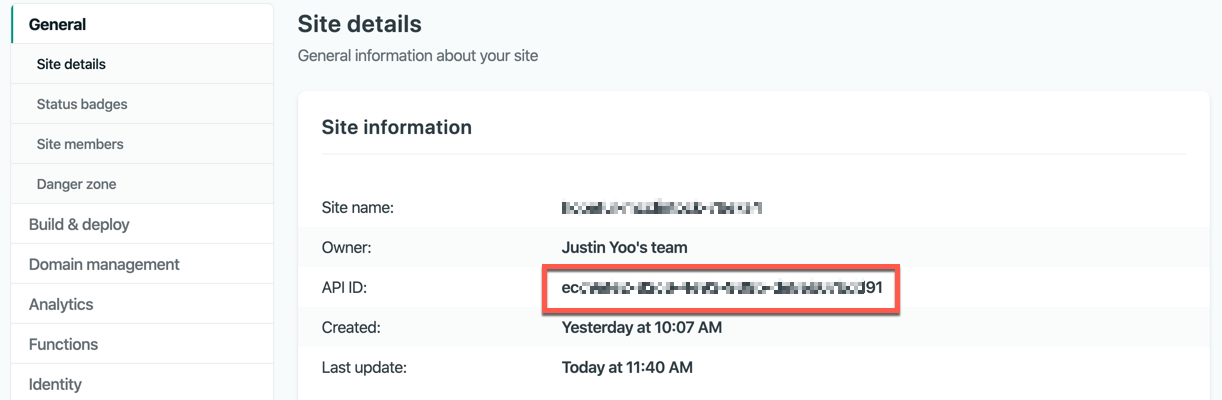
Now, the newly created instance has its own instance ID and site name, which will be used in GitHub Actions.
Finally, we need to create a Personal Access Token for deployment through Netlify CLI.
Preparing GitHub Actions Workflow
We've now got the static website artifact and Netlify instance. The GitHub Actions workflow will orchestrate all the things.
Event
I'm using the master branch to update the original starter, and the dev branch to publish posts. Therefore, I set up the push event only triggered by the dev branch.
| on: | |
| push: | |
| branches: | |
| - dev |
Runner
I used Ubuntu LTS 18.04 as the GitHub-hosted runner.
| jobs: | |
| build_and_publish: | |
| runs-on: ubuntu-latest |
Steps
The first step should be the checkout action.
| steps: | |
| - name: Checkout the repo | |
| uses: actions/checkout@v1 |
All the rest actions are using the built-in shell action. This action downloads and installs the Netlify CLI. Due to the -g option, we should use the sudo command here.
| - name: Install Netlify CLI | |
| shell: bash | |
| run: | | |
| sudo npm install -g netlify-cli |
This action restores all the npm packages.
| - name: Install npm packages | |
| shell: bash | |
| run: | | |
| npm install |
This interim action will replace Gist.js until the official release is updated.
| - name: Monkey patch npm package (Interim) | |
| shell: bash | |
| run: | | |
| cp patches/Gist.js node_modules/@noxify/gridsome-plugin-remark-embed/src/providers |
This action builds the app.
| - name: Build app | |
| shell: bash | |
| run: | | |
| npm run build |
As the second last step, it copies the domain redirection settings to dist.
| - name: Apply redirects | |
| shell: bash | |
| run: | | |
| cp _redirects dist |
And finally, the dist directory is published to Netlify through CLI. Both NETLIFY_SITE_ID and NETLIFY_AUTH_TOKEN are secrets stored in the repository settings.
| - name: Publish app | |
| shell: bash | |
| run: | | |
| netlify deploy -p -s ${{ secrets.NETLIFY_SITE_ID }} -a ${{ secrets.NETLIFY_AUTH_TOKEN }} |
We all complete the blog migration from Wordpress to gridsome. Now, I don't have to worry about maintenance unless GitHub shuts down.