Throughout this post series, let's find out an example how Power Platform increases productivity by simplifying an ad-hoc workflow to provision resources like Azure VM onto Azure.
- Auto-installing Applications on Azure VM with Chocolatey for Live Streaming
- Ad-hoc Azure Resource Provisioning via Power Platform
Everything has gone. I mean all off-line meetups and conferences disappeared. Instead, they have gone virtual – online meetups and conferences. For community events, they have two options – one that purchases a solution for online events, and the other that build a live streaming solution by themselves. If you are a community event organiser and running a live streaming session by yourself, it doesn't really matter whether you install all necessary applications on your computer or not. However, if the event scales out, which includes inviting guests and/or sharing screens, it could be challenging unless your computer has relatively high spec enough.
For this case, there are a few alternatives. One option is to use a virtual machine (VM) on the Cloud. A VM instance can be provisioned whenever necessary, then destroyed whenever no longer required. However, this approach also has a caveat from the "live streaming" point of view. Every time you provision the VM instance, you should install all the necessary applications by hand. If this is not happening very often, it may be OK. But it's still cumbersome to manually install those apps. Throughout this post, I'm going to discuss how to automatically install live streaming related software using Chocolatey during the provision of Azure Windows VM.
The sample code used in this post can be found at this GitHub repository.
Acknowledgement
Thanks Henk Boelman and Frank Boucher! Their awesome blog posts, Henk's one and Frank's one helped a lot to me set this up.
Installing Live Streaming Applications
As we're using a Windows VM, we need those applications for live streaming.
- Microsoft Edge (Chromium): As of this writing, Chromium-based Edge is not installed as default. Therefore, it's good to update to this version.
- OBS Studio: Open source application for live streaming.
- OBS Studio NDI Plug-in: As OBS itself doesn't include the NDI feature, this plug-in is required for live streaming.
- Skype for Content Creators: This version of Skype can enable the NDI feature. With this feature enabled, we can capture screens from all participants and shared screens, respectively.
These are the bare minimum for live streaming. Let's compose a PowerShell script that installs them via Chocolatey. First of all, we need to install Chocolatey using the downloadable installation script (line #2). Then, install the software using Chocolatey (line #5-8). The command may look familiar if you've used a CLI-based application package management tool like apt or yum from Linux, or brew from Mac.
| #Install Chocolatey | |
| Set-ExecutionPolicy Bypass -Scope Process -Force; iex ((New-Object System.Net.WebClient).DownloadString('https://chocolatey.org/install.ps1')) | |
| #Install Software | |
| choco install microsoft-edge -y | |
| choco install obs-studio -y | |
| choco install obs-ndi -y | |
| choco install skype -y |
So, if this installation script can be executable while provisioning the Windows VM instance on Azure, we can always use the fresh VM with newly installed applications.
Provisioning Azure Windows VM
Now, let's provision a Windows VM on Azure. Instead of creating the instance on Azure Portal, we can use the ARM template for this. Although there are thousands of ways using the ARM template, let's use the quick start templates as a starting point. Based on this template, we can customise the template for our live streaming purpose. We use the template, Deploy a simple Windows VM, and update it. Here is the template. I omitted details for brevity, except VM specs like VM size (line #43) and VM image details (line #48-51).
| { | |
| "$schema": "https://schema.management.azure.com/schemas/2019-04-01/deploymentTemplate.json#", | |
| "contentVersion": "1.0.0.0", | |
| "parameters": { | |
| ... | |
| }, | |
| "variables": { | |
| ... | |
| }, | |
| "resources": [ | |
| { | |
| "comments": "=== STORAGE ACCOUNT ===", | |
| "type": "Microsoft.Storage/storageAccounts", | |
| ... | |
| }, | |
| { | |
| "comments": "=== PUBLIC IP ADDRESS ===", | |
| "type": "Microsoft.Network/publicIPAddresses", | |
| ... | |
| }, | |
| { | |
| "comments": "=== NETWORK SECURITY GROUP: DEFAULT ===", | |
| "type": "Microsoft.Network/networkSecurityGroups", | |
| ... | |
| }, | |
| { | |
| "comments": "=== VIRTUAL NETWORK ===", | |
| "type": "Microsoft.Network/virtualNetworks", | |
| ... | |
| }, | |
| { | |
| "comments": "=== NETWORK INTERFACE ===", | |
| "type": "Microsoft.Network/networkInterfaces", | |
| ... | |
| }, | |
| { | |
| "comments": "=== VIRTUAL MACHINE ===", | |
| "type": "Microsoft.Compute/virtualMachines", | |
| "apiVersion": "[variables('virtualMachine').apiVersion]", | |
| ... | |
| "properties": { | |
| "hardwareProfile": { | |
| "vmSize": "Standard_D8s_v3" | |
| }, | |
| ... | |
| "storageProfile": { | |
| "imageReference": { | |
| "publisher": "MicrosoftWindowsDesktop", | |
| "offer": "Windows-10", | |
| "sku": "20h1-pro-g2", | |
| "version": "latest" | |
| }, | |
| ... | |
| }, | |
| ... | |
| } | |
| }, | |
| { | |
| "comments": "=== VIRTUAL MACHINE EXTENSION: CUSTOM SCRIPT ===", | |
| "type": "Microsoft.Compute/virtualMachines/extensions", | |
| ... | |
| } | |
| ], | |
| "outputs": {} | |
| } |
If you want to see the full ARM template, click the following link to GitHub.
Custom Script Extension
We've got the VM instance ready. However, we haven't figured out how to run the PowerShell script during the provision. To run the custom script, add this extension to the ARM template. The custom script in the template looks below. The most important part of this template is the property value. Especially, pay attention to both fileUris (line #16) and commandToExecute (line #19).
| { | |
| "comments": "=== VIRTUAL MACHINE EXTENSION: CUSTOM SCRIPT ===", | |
| "type": "Microsoft.Compute/virtualMachines/extensions", | |
| "apiVersion": "[providers('Microsoft.Compute', 'virtualMachines/extensions').apiVersions[0]]", | |
| "name": "[concat('mystreamingvm', '/config-app')]", | |
| "location": "[resourceGroup().location]", | |
| "dependsOn": [ | |
| "[resourceId('Microsoft.Compute/virtualMachines', 'mystreamingvm')]" | |
| ], | |
| "properties": { | |
| "publisher": "Microsoft.Compute", | |
| "type": "CustomScriptExtension", | |
| "typeHandlerVersion": "1.10", | |
| "autoUpgradeMinorVersion": true, | |
| "settings": { | |
| "fileUris": "https://raw.githubusercontent.com/devkimchi/LiveStream-VM-Setup-Sample/main/install.ps1" | |
| }, | |
| "protectedSettings": { | |
| "commandToExecute": "[concat('powershell -ExecutionPolicy Unrestricted -File ', './install.ps1')]" | |
| } | |
| } | |
| } |
fileUrisindicates the location of the custom script. The custom script MUST be publicly accessible like GitHub URL or Azure Blob Storage URL.commandToExecuteis the command to execute the custom script. As we use the PowerShell script downloaded externally, add the-ExecutionPolicy Unrestrictedparameter to loosen the permission temporarily../install.ps1is the filename of the executing script from the URL.
ARM Template Execution
Once everything is done, run the ARM template for deployment. Here's the PowerShell command:
| New-AzResourceGroupDeployment ` | |
| -Name <deployment-name> ` | |
| -ResourceGroupName <resource-group-name> ` | |
| -TemplateFile ./azuredeploy.json ` | |
| -TemplateParameterFile ./azuredeploy.parameters.json ` | |
| -Verbose |
And, here's the Azure CLI command:
| az group deployment create \ | |
| -n <deployment-name> \ | |
| -g <resource-group-name> \ | |
| --template-file ./azuredeploy.json \ | |
| --parameters ./azuredeploy.parameters.json \ | |
| --verbose |
If you're lazy enough, click the following button to run the deployment template directly on Azure Portal.

It takes time to complete all the provisioning. Once it's done, access to VM through either RDP or Bastion.
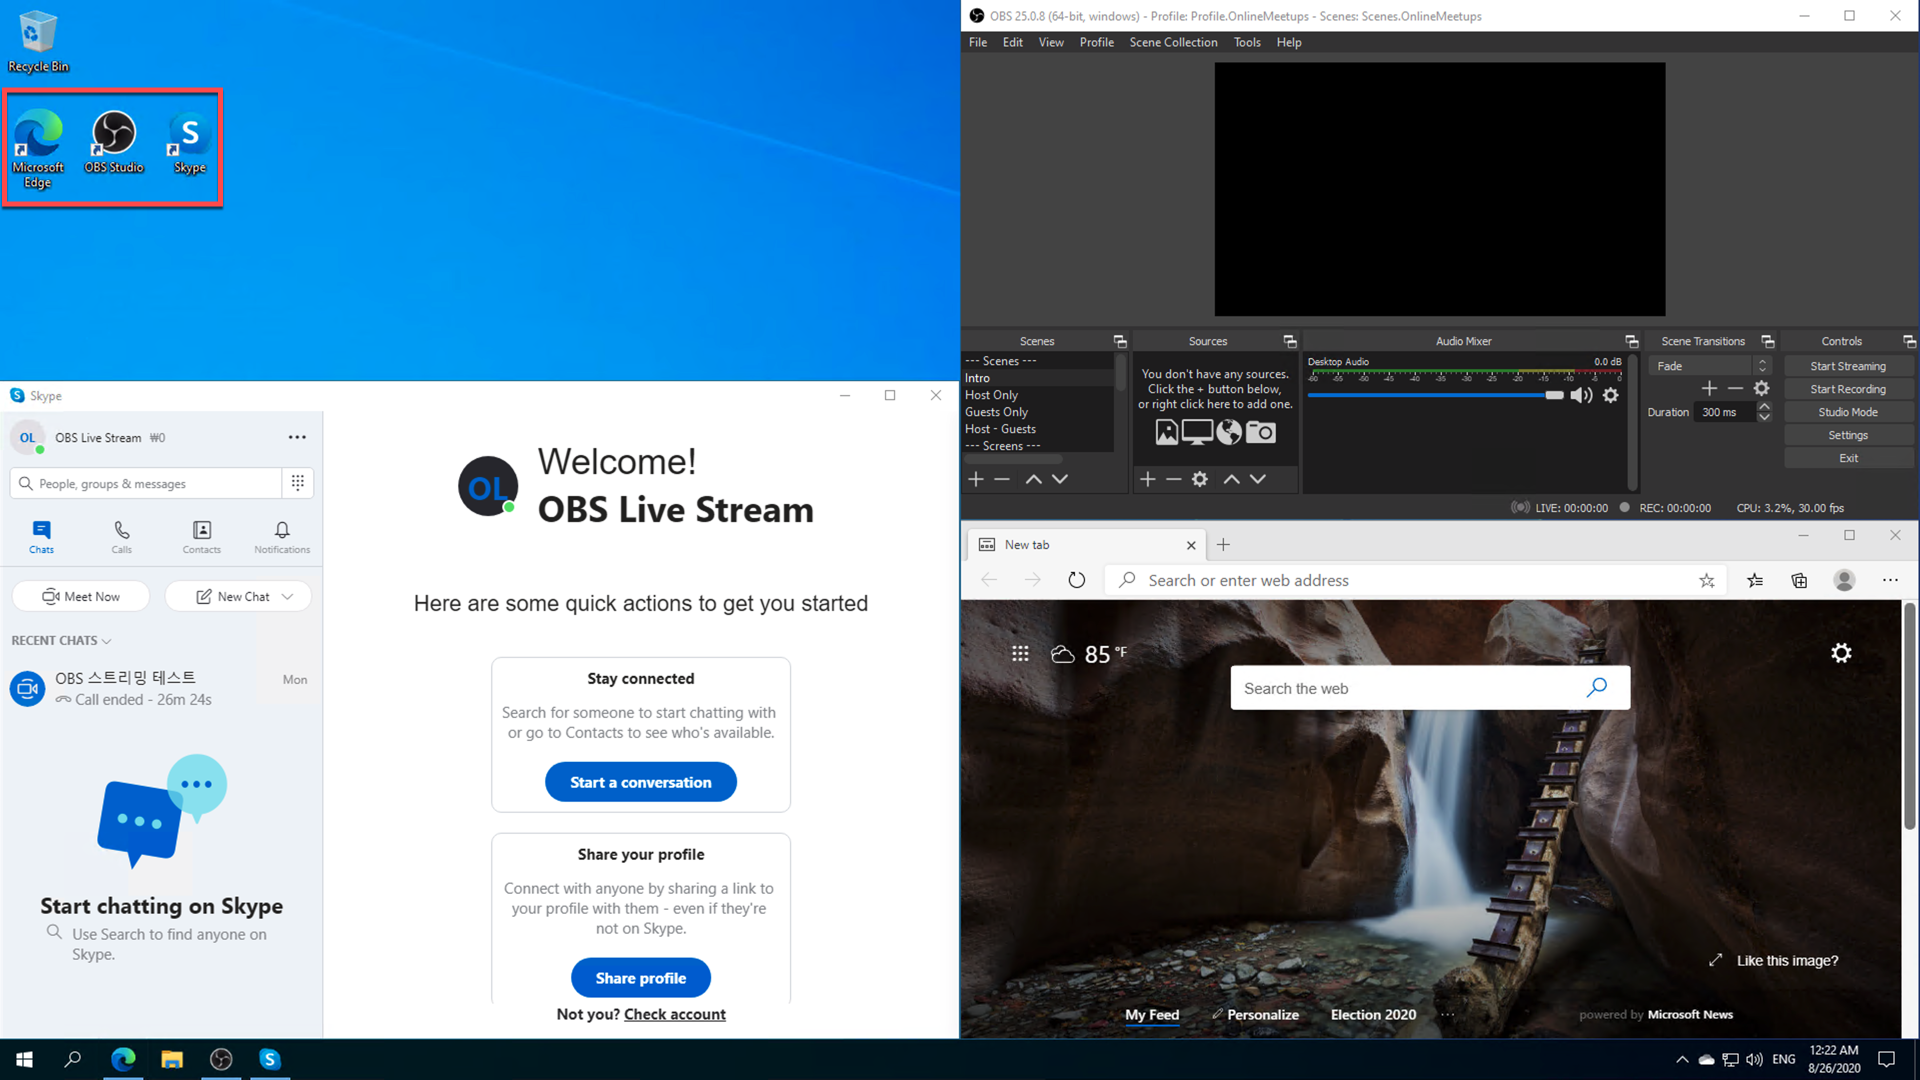
You can see all the applications have been installed!
So far, we've discussed how to automatically install applications for live streaming, using Chocolatey, while provisioning a Windows VM on Azure. There are many reasons to provision and destroy VMs on the Cloud. Using an ARM Template and custom script for the VM provisioning will make your life easier. I hope this post gives small tips to live streamers using VMs for their purpose.
I'm going to discuss, in the next post, how Power Platform increases productivity against this sort of ad-hoc Azure resource provisioning.