Throughout this series, I'm going to show how an Azure Functions instance can map APEX domains, add an SSL certificate and update its public inbound IP address to DNS.
- 3 Ways Mapping APEX Domains to Azure Functions
- Adding Let's Encrypt SSL Certificate to Azure Functions
- Updating Azure DNS and SSL Certificate on Azure Functions via GitHub Actions
- Deploying Azure Functions via GitHub Actions without Publish Profile
In my previous post, I discussed how to map a root domain or APEX domain with an Azure Functions instance. Let's bind an SSL certificate to the custom domain, which is generated by Let's Encrypt so that we can enable HTTPS connection through the custom domain.
Let's Encrypt
Let's Encrypt is a non-profit organisation that issues free SSL certificate. Although it's free, it's widely accepted and backed by many tech companies. There are a few limitations, though. It's valid only for three months. In other words, we MUST renew the SSL certificate issued by Let's Encrypt for every three months. But you know, we've got automation! So, don't worry about the certificate renewal as long as we've got the automation process for it.
Azure App Service Site Extension
Azure App Service provides the site extension feature. One of the extensions is the Let's Encrypt Site Extension. It's written as the Azure WebJob style so that the WebJob runs every three months to renew the certificate automatically. It's a pretty useful extension.
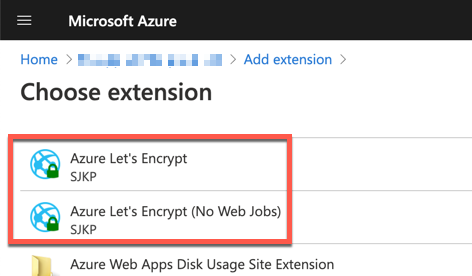
However, this extension has a few critical drawbacks as well.
- It only runs on Windows-based App Service instances (including Azure Functions) because WebJob basically relies on the Windows platform. No Linux-based App Service, unfortunately.
- It shares the runtime environment with the App Service instance. Therefore, whenever we deploy a new App Service instance, we MUST always deploy the extension and configure it.
- If we deploy an application with the "delete all files before deployment" option, the WebJob will get deleted.
It doesn't seem to be a way for production use. What else can we take to bind the SSL certificate for free?
Azure Functions App Only for SSL Certificate Management
We're lucky enough to have Shibayan who publishes an excellent Azure Function app that manages Let's Encrypt SSL Certificate with no dependency on the App Service instances. Through the application, we can quickly generate and renew as many SSL certificates as we can and store them to Azure Key Vault. The stored SSL certificates are directly bound to Azure Functions instances. How fantastic!
First of all, run the ARM template below to provision an Azure Functions app and Key Vault instance. But, if you like, you can write your own ARM template and run it.
The provisioned Azure Functions app instance got the Managed Identity feature enabled so the app can directly access to the Key Vault instance to store SSL certificates. Once all relevant resources are provisioned, follow the process below.
Let's say the Azure Functions app instance for the SSL certificate management as
https://ssl-management.azurewebsites.net.
Authentication / Authorisation
The provisioned Azure Functions app includes an admin UI which is only accessible through authentication. Therefore, activate the Authentiation / Authorisation feature like below:
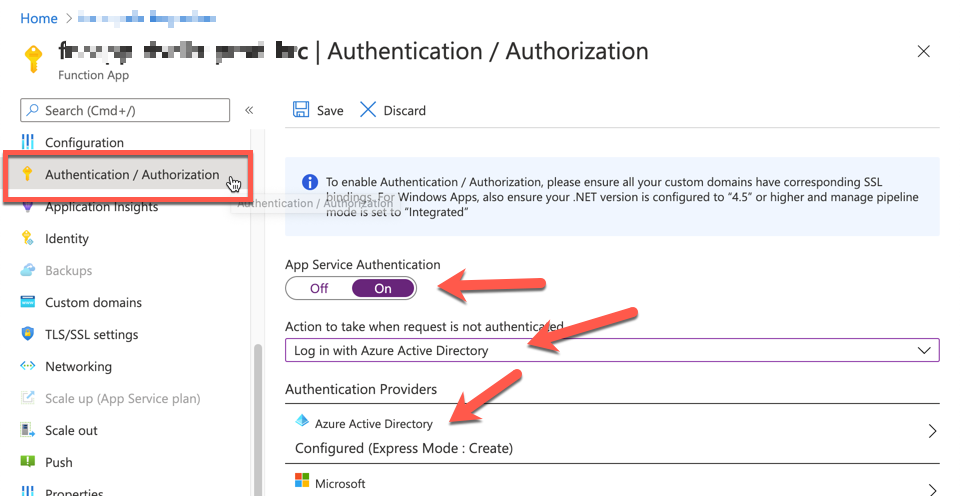
Then, configure the Azure Active Directory for authentication. We use the account registered to Azure Active Directory. Set the management mode to Express and put the app name. The default value of the app name is the Function app name. We don't need to change it.
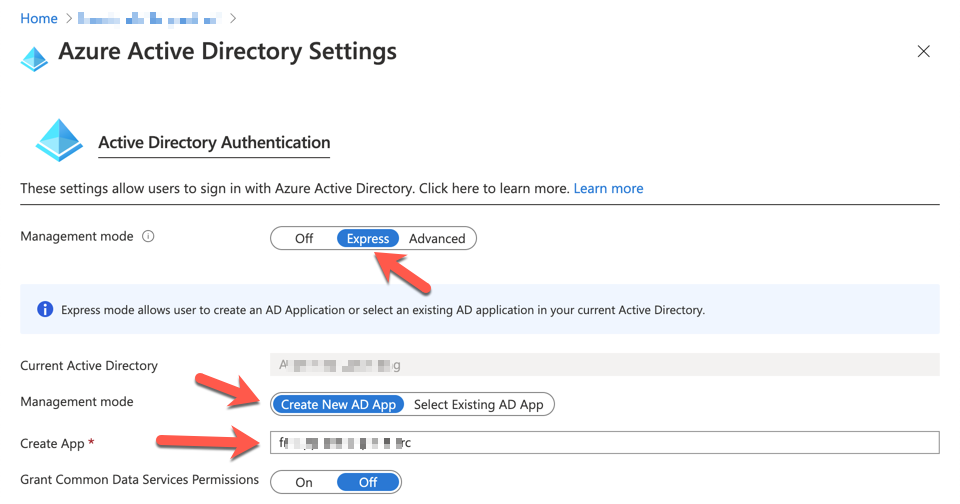
Now, we got the Azure Functions app configured for SSL certificate management.
Azure DNS Configuration
I'm assuming that we use Azure DNS for domain management. Go to the resource group where the Azure DNS instance is provisioned and select Access control (IAM) blade, then assign a role to the Azure Functions app for SSL certificate management.
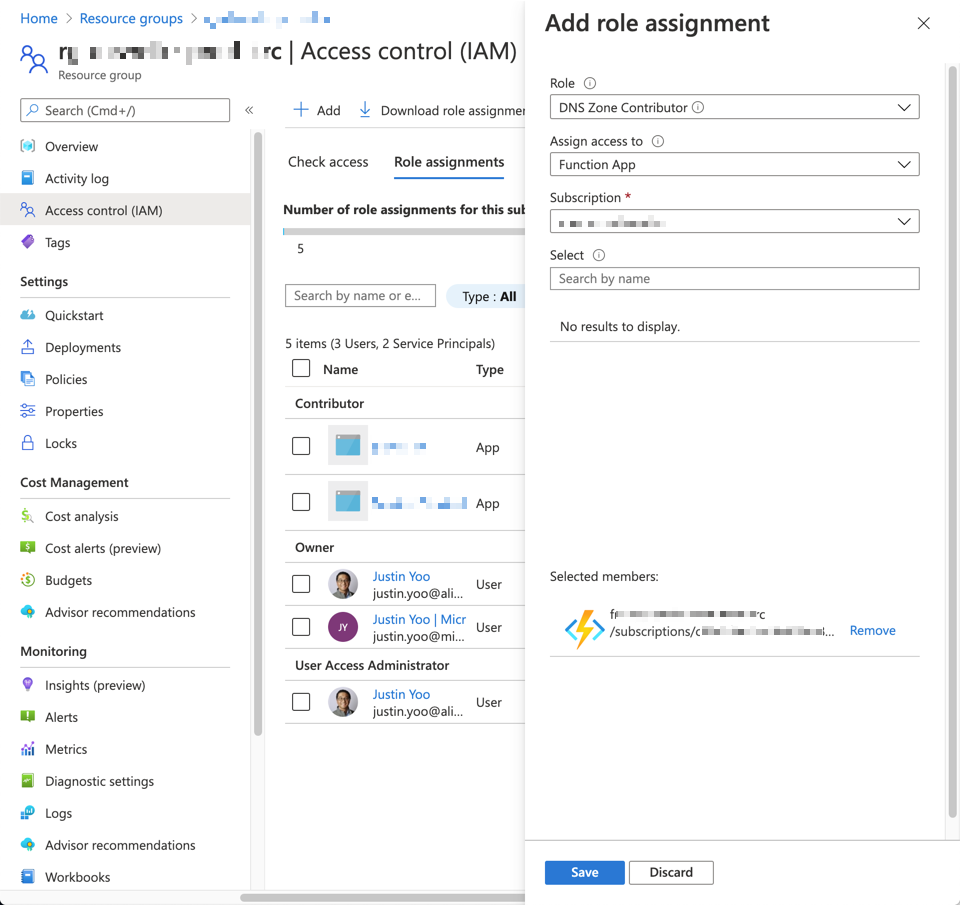
Role: DNS Zone ContributorAssign access to: Function AppSelected members: Azure Functions app for SSL certificate management. Only apps that Managed Identity feature enabled appear here.
SSL Certificate Generation
Open a web browser and access to the admin UI for the SSL certificate management, by accessing to https://ssl-management.azurewebsites.net/add-certificate. If it's the first time for you to access, you'll be asked to log-in.
Once logged-in, the admin UI appears. For APEX domain, enter nothing to the Record name field then click the Add button. If you want to issue the certificate for subdomains, add the subdomain to the Record name field. You can also issue one certificate for as many domains as you want. Here we generate one certificate for both cnts.com and dev.cnts.com.
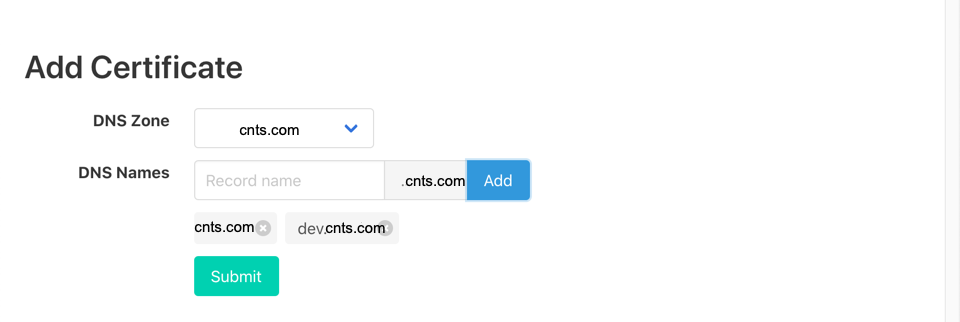
If you prefer to creating a separate certificate for each domain,
cnts.comanddev.cnts.com, then run the registration twice.
Once completed, the pop-up appears like:

Let's go to the Azure Key Vault instance to check whether the SSL certificate has been generated or not.

SSL Certificate Binding to APEX Custom Domain on Azure Functions
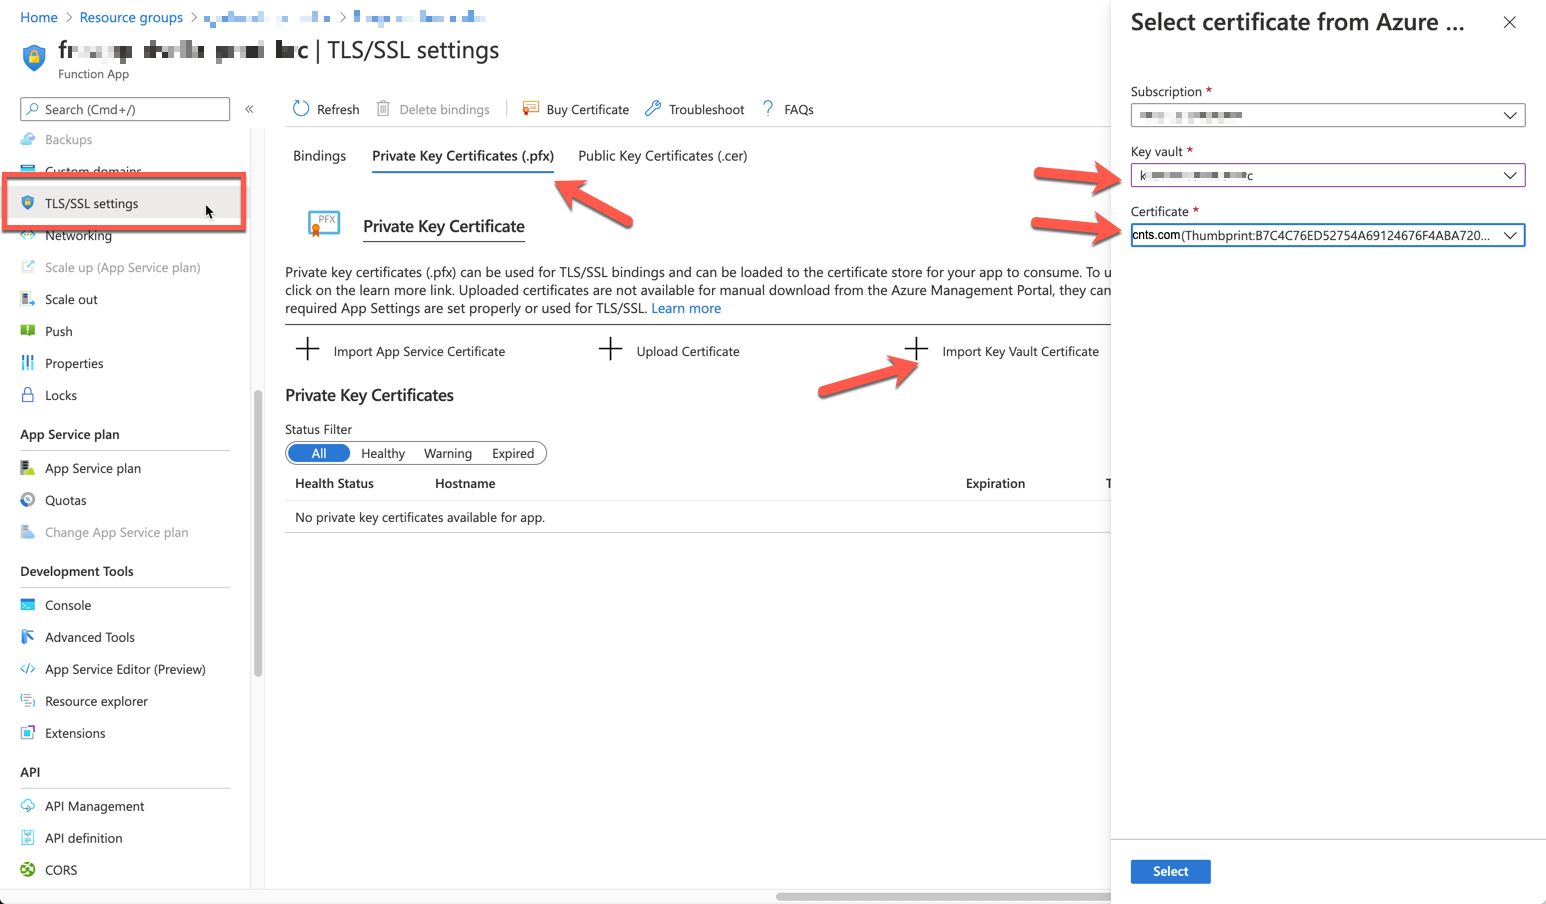
We've got the custom APEX domain, mapped from the previous post. Now, it's time to bind the certificate with the domain. Go to the Azure Functions instance that I want to attach the certificate and select the TLS/SSL settings blade. Click the Private Key Certificates (.pfx) tab then Import Key Vault Certificate button to import the one stored in our Key Vault instance.
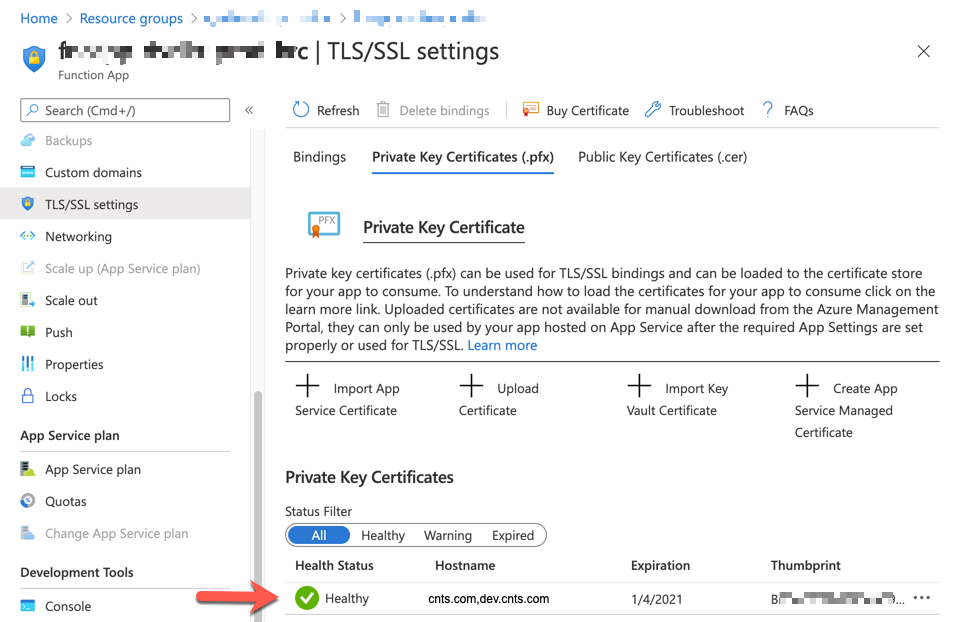
Once imported, you can see the screen below. As we generated one certificate for both cnts.com and dev.cnts.com, it's normal to see both domain names.
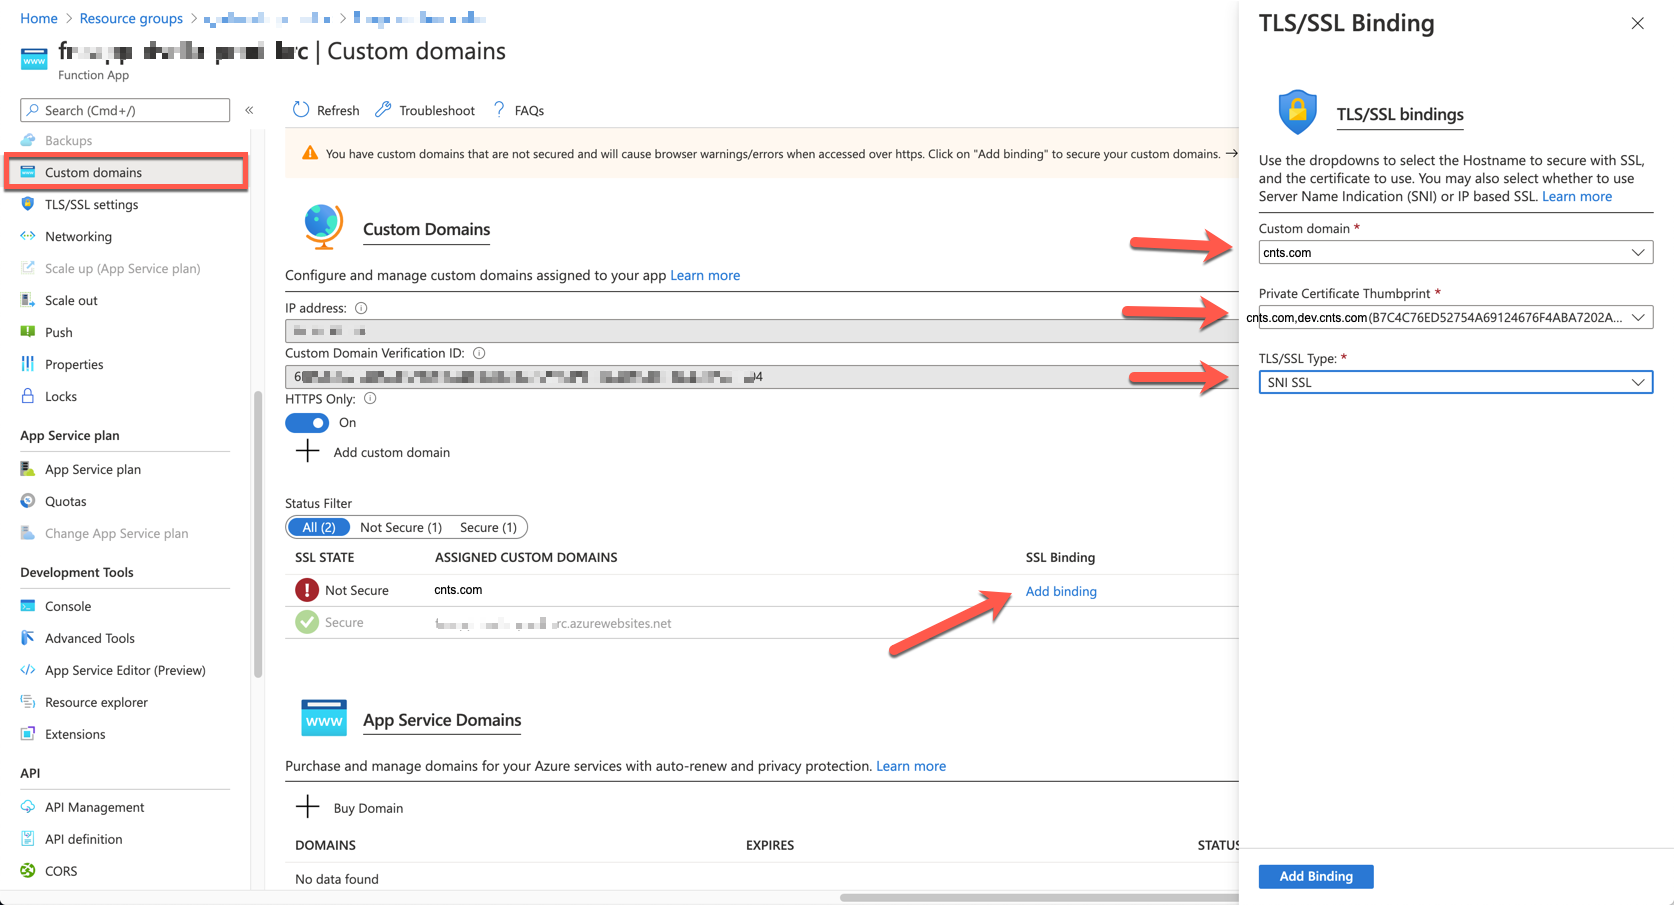
Let's select the Custom domains blade. The domain is still not bound with the SSL certificate that we just imported. Click the Add binding link, choose cnts.com for the Custom domain field, cnts.com,dev.cnts.com for the Private Certificate Thumbprint field. And finally, choose SNI SSL for the TLS/SSL Type field.
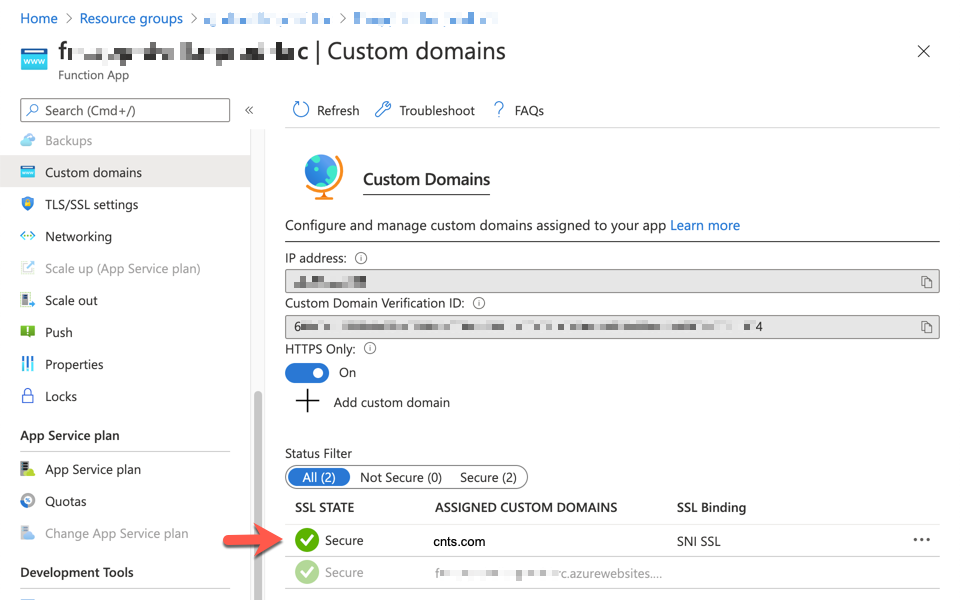
Now we can see the SSL certificate is properly bound with the custom APEX domain.
So far, we've walked through how Let's Encrypt SSL certificate can be bound with a Custom APEX domain on Azure Functions instance. In the next post, I'll discuss how to automatically update the the A Record of Azure DNS when the inbound IP of the Azure Functions instance is changed.