This is the second post of the series to let teachers and lecturers build an online students' check-in app, using Power Apps, Azure Functions, and Azure Face API.
- Capturing Face Images from Browser to Azure Blob Storage via Azure Functions
- Identifying Students' Face with Azure Functions and Azure Face API
- Building Students' Check-in App with Power Apps, Azure Functions and Azure Face API
In my previous post, I walked through how to take faces from a webcam, using Azure Functions and upload them to Azure Blob Storage. In this post, let's figure out how to identify faces using Azure Face API.
The sample code used in this post can be downloaded from Azure Functions Face Recognition Sample.
The Workflow
Here's the simplified workflow for this post:
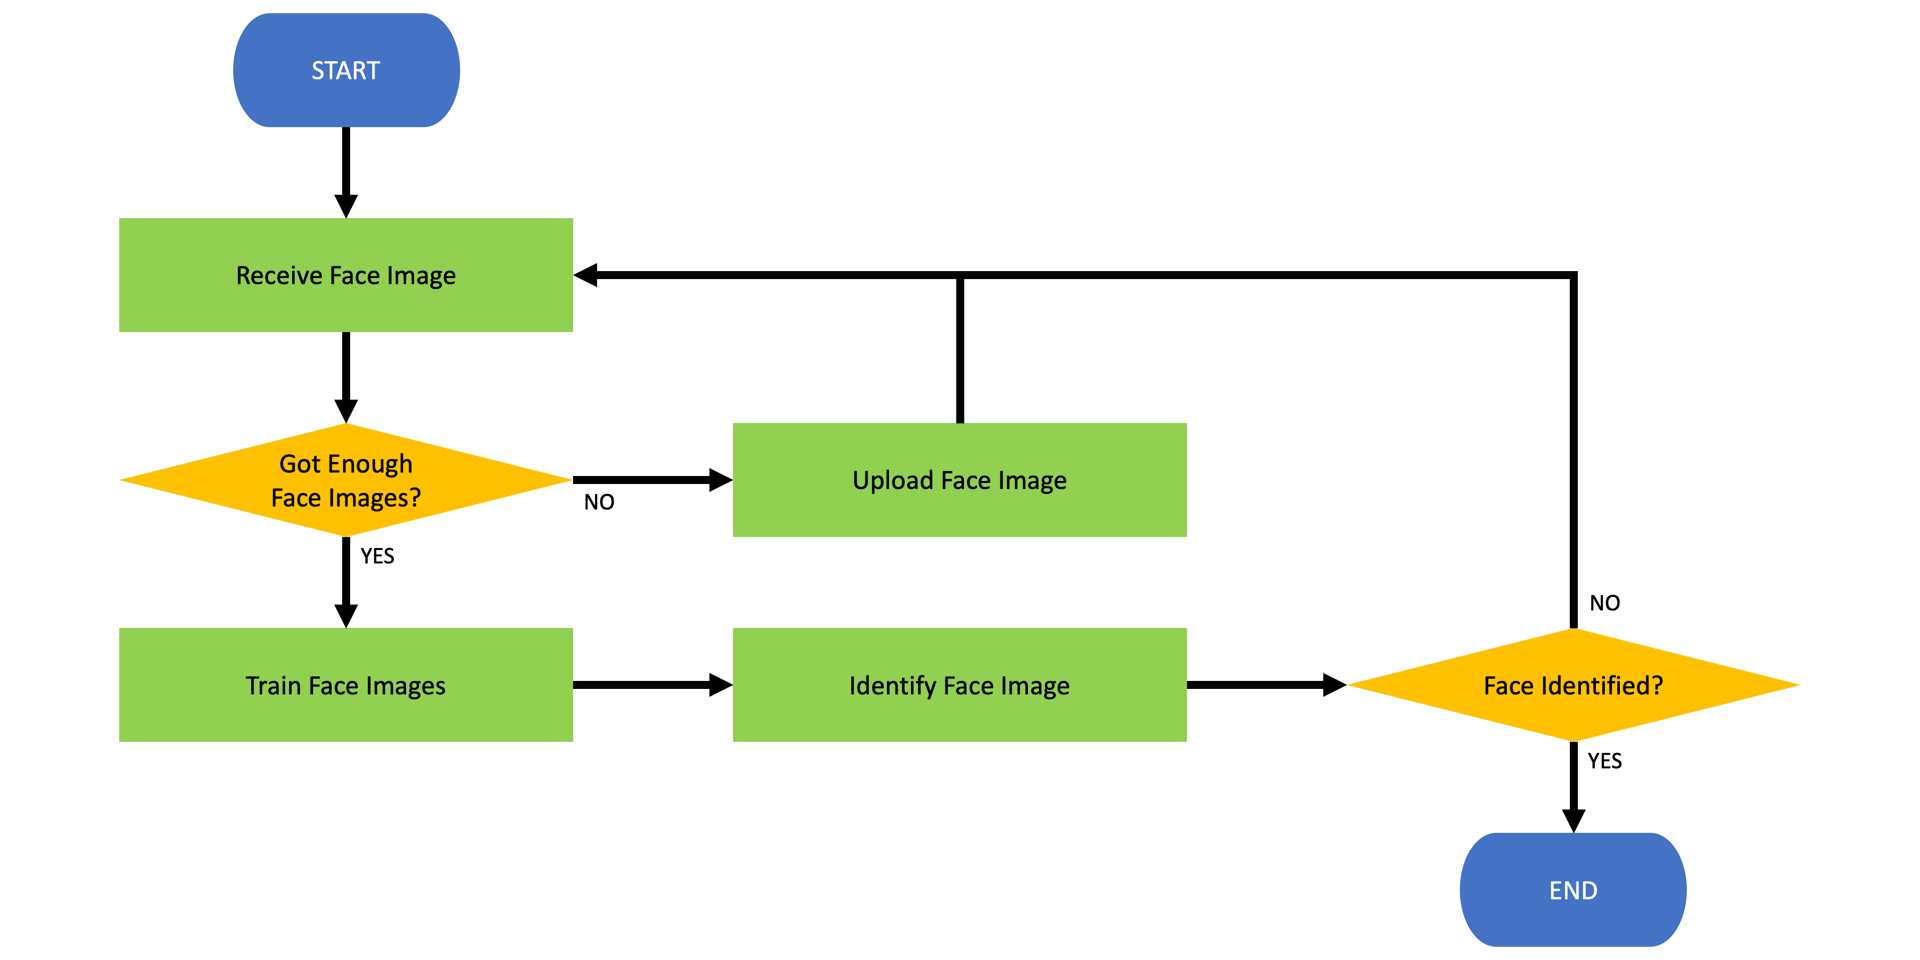
We've got both "Receive Face Image" and "Upload Face Image" actions implemented at the previous post. We're going to put a checking logic ("Got Enough Face Images?") in the middle, and add "Train Face Images" and "Identify Face Image" actions and the check logic of "Face Identified?". Let's start.
Environment Variables
Here are the environment variables used in this function app.
| var sasToken = Environment.GetEnvironmentVariable("Blob__SasToken"); | |
| var containerName = Environment.GetEnvironmentVariable("Blob__Container"); | |
| var personGroup = Environment.GetEnvironmentVariable("Blob__PersonGroup"); | |
| var numberOfPhotos = Convert.ToInt32(Environment.GetEnvironmentVariable("Blob__NumberOfPhotos")); | |
| var tableName = Environment.GetEnvironmentVariable("Table__Name"); | |
| var authKey = Environment.GetEnvironmentVariable("Face__AuthKey"); | |
| var endpoint = Environment.GetEnvironmentVariable("Face__Endpoint"); | |
| var confidence = Convert.ToDouble(Environment.GetEnvironmentVariable("Face__Confidence")); |
As they are frequently used in the code snippet below, keep them in mind.
Got Enough Face Images?
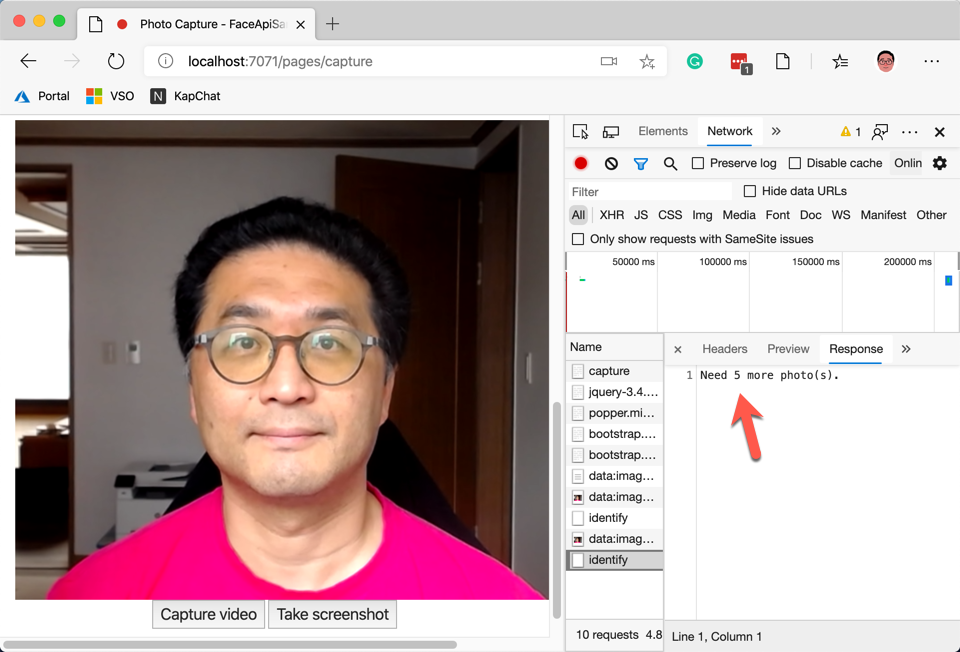
The value of Blob__NumberOfPhotos sets the number of face images required for face identification. The larger number it is, the more accurate the face identification result is. But on the flip side, it takes longer if the number gets bigger. Here in this post, I set the value to 6. Therefore, the function app only picks up six images from Azure Blob Storage in a random way (line #6). Here's the logic:
| var client = new CloudBlobClient(); | |
| var container = client.GetContainerReference(containerName); | |
| await container.CreateIfNotExistsAsync().ConfigureAwait(false); | |
| var segment = await container.ListBlobsSegmentedAsync($"{personGroup}/", true, BlobListingDetails.Metadata, numberOfPhotos, null, null, null) | |
| .ConfigureAwait(false); | |
| var images = segment.Results.Select(p => (CloudBlockBlob)p).ToList(); | |
| if (images.Count < numberOfPhotos) | |
| { | |
| var uploaded = DO_IMAGE_UPLOAD(); | |
| return new CreatedResult(uploaded.Uri, $"Need {numberOfPhotos - blobs.Count} more photo(s)."); | |
| } |
Once you run the function app at this point, you will be only able to see the message like this, until you have enough number of photos (line #15).
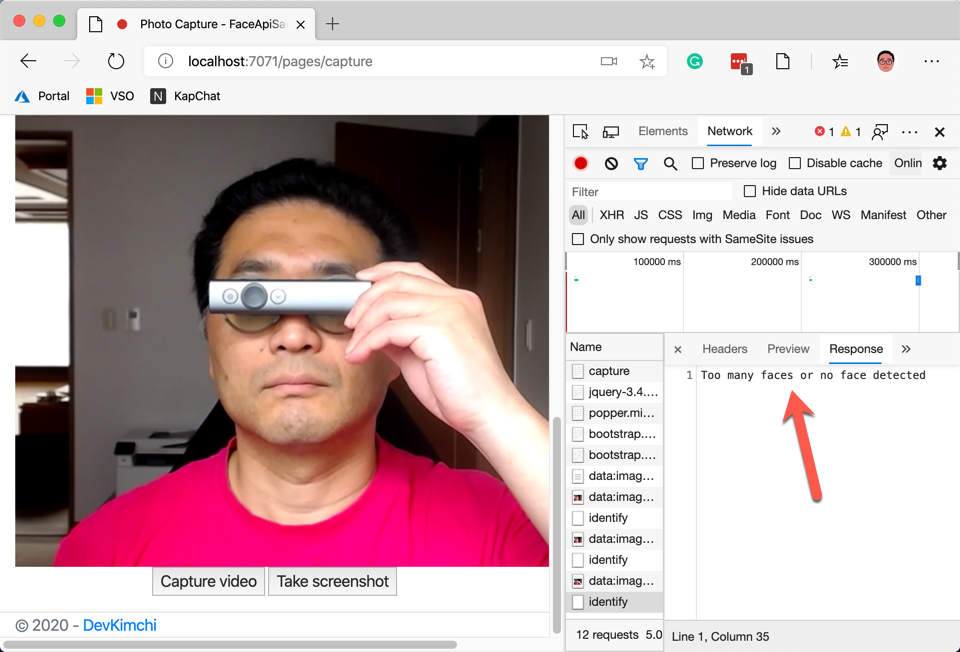
The code above will randomly take as many photos as the number, from the Azure Blob Storage. If there are not enough photos, it will return the message to store more photos. By the way, where's the randomising logic? Well, the filename is GUID which is random enough. Those images taken from the Blob Storage will be used as a control group. Let's look at the code below. When a new face image is taken, and there are more faces in the photo, it won't be able to use (line #11).
| var credentials = new ApiKeyServiceClientCredentials(authKey); | |
| var client = new FaceClient(credentials) { Endpoint = endpoint }; | |
| var url = $"{face.Uri.AbsoluteUri}{sasToken}"; | |
| var faces = await client.Face | |
| .DetectWithUrlAsync(url, recognitionModel: RecognitionModel.Recognition01) | |
| .ConfigureAwait(false); | |
| if (faces.Count != 1) | |
| { | |
| return new BadRequestObjectResult("Too many faces or no face detected"); | |
| } |
The code above sends the face image to Face API to check whether there is only one face or not. As the Blob Storage is not accessible from the public, a SAS token MUST be appended to get the image. The token value comes from the environment variable of Blob__SasToken. If there is no face or more than one face detected in the photo, it's not appropriate to use for the face identification. Therefore, it's rejected with the Bad Request status code.
Train Face Images
Now, we've got enough number of face images and one for the identification. It's time to train the randomly chosen face images as a control group. The code below shows the preparation for the training.
| var personGroupId = Guid.NewGuid().ToString(); | |
| var client = new CloudTableClient(); | |
| var table = client.GetTableReference(tableName); | |
| await table.CreateIfNotExistsAsync().ConfigureAwait(false); | |
| var entity = new FaceEntity(personGroup, personGroupId); | |
| var operation = TableOperation.InsertOrReplace(entity); | |
| await table.ExecuteAsync(operation).ConfigureAwait(false); |
As we use Azure Table Storage to log identification history, a new record has been added (line #8-9). The FaceEntity is involved in the overall process for face identification. The FaceEntity instance stores both personGroup and personGroupId values.
Let's see the code below. To identify the face, we need to create a PersonGroup (line #4-6) and Person inside it (line #8-10). Here's the code:
| var credentials = new ApiKeyServiceClientCredentials(authKey); | |
| var client = new FaceClient(credentials) { Endpoint = endpoint }; | |
| await client.PersonGroup | |
| .CreateAsync(entity.PersonGroupId, entity.PersonGroup, recognitionModel: RecognitionModel.Recognition01) | |
| .ConfigureAwait(false); | |
| var person = await client.PersonGroupPerson | |
| .CreateAsync(entity.PersonGroupId, entity.PersonGroup) | |
| .ConfigureAwait(false); | |
| entity.PersonId = person.PersonId.ToString(); |
The face images as a control group are uploaded to Person (line #9-11). The face images used for the control group is stored in the FaceIds property.
| var credentials = new ApiKeyServiceClientCredentials(authKey); | |
| var client = new FaceClient(credentials) { Endpoint = endpoint }; | |
| var faceIds = new List<string>(); | |
| foreach (var face in faces) | |
| { | |
| var url = $"{face.Uri.AbsoluteUri}{sasToken}"; | |
| var added = await client.PersonGroupPerson | |
| .AddFaceFromUrlAsync(entity.PersonGroupId, person.PersonId, url, face.Name) | |
| .ConfigureAwait(false); | |
| var filename = face.Name | |
| .Replace($"{personGroup}/", string.Empty) | |
| .Replace(".png", string.Empty); | |
| faceIds.Add(filename); | |
| } | |
| entity.FaceIds = string.Join(",", faceIds); |
It's ready for the training. Run the TrainAsync() method (line #4-6).
| var credentials = new ApiKeyServiceClientCredentials(authKey); | |
| var client = new FaceClient(credentials) { Endpoint = endpoint }; | |
| await client.PersonGroup | |
| .TrainAsync(entity.PersonGroupId) | |
| .ConfigureAwait(false); | |
| while (true) | |
| { | |
| await Task.Delay(1000); | |
| var trainingStatus = await client.PersonGroup | |
| .GetTrainingStatusAsync(entity.PersonGroupId) | |
| .ConfigureAwait(false); | |
| if (trainingStatus.Status == TrainingStatusType.Succeeded) | |
| { | |
| break; | |
| } | |
| } |
As it takes time until the training is over, the while { ... } loop is useful to check the training result (line #11-13). Finally, the training is over. It's time to compare the new face picture to the control group.
Identify Face Image
The new face image for the identification MUST also be detected whether there is only one face exists or not. Once this process is over, the face is compared to the control group (line #7-9).
| var credentials = new ApiKeyServiceClientCredentials(authKey); | |
| var client = new FaceClient(credentials) { Endpoint = endpoint }; | |
| var faces = DO_FACE_DETECTION(); | |
| var detected = faces.Select(p => p.FaceId.Value).ToList(); | |
| var identified = await client.Face | |
| .IdentifyAsync(detected, entity.PersonGroupId) | |
| .ConfigureAwait(false); | |
| entity.Confidence = identified.First().Candidates.First().Confidence; |
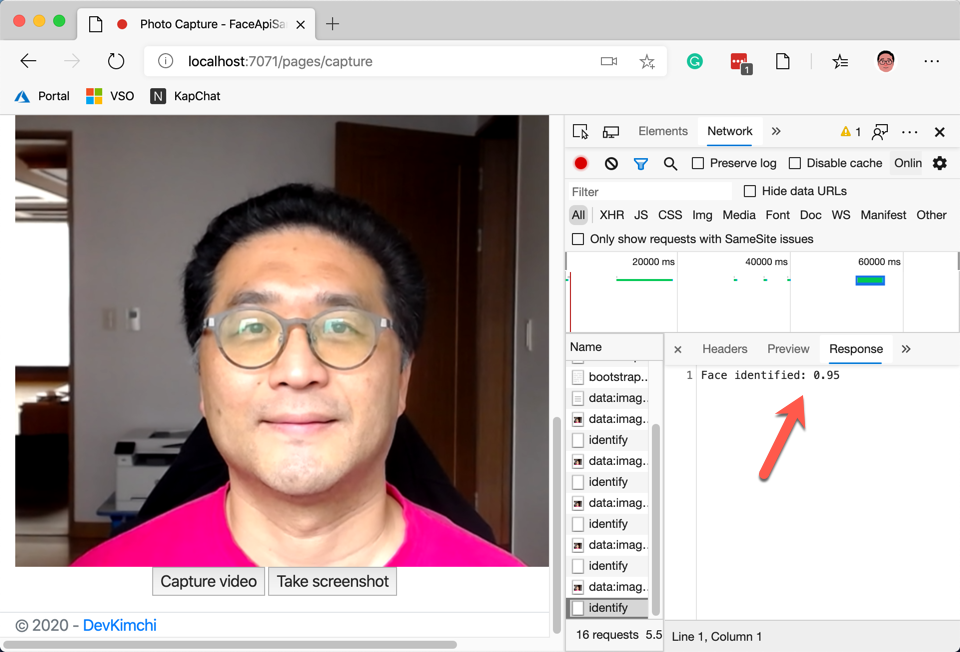
The Confidence value is the result of face identification. If this value is 1, it's the identical face, if 0, it's entirely a different face.
Face Identified?
We've also got the environment variable of Face__Confidence, which contains a threshold value. If the Confidence result is higher than the Face__Confidence value, the face is considered as "identified". The code below handles the confidence value.
| // var confidence = Convert.ToDouble(Environment.GetEnvironmentVariable("Face__Confidence")); | |
| if (entity.Confidence < confidence) | |
| { | |
| return new BadRequestObjectResult($"Face not identified: {entity.Confidence:0.00}"); | |
| } | |
| return new OkObjectResult($"Face identified: {entity.Confidence:0.00}"); |
Here are the result of both "Success" and "Fail".
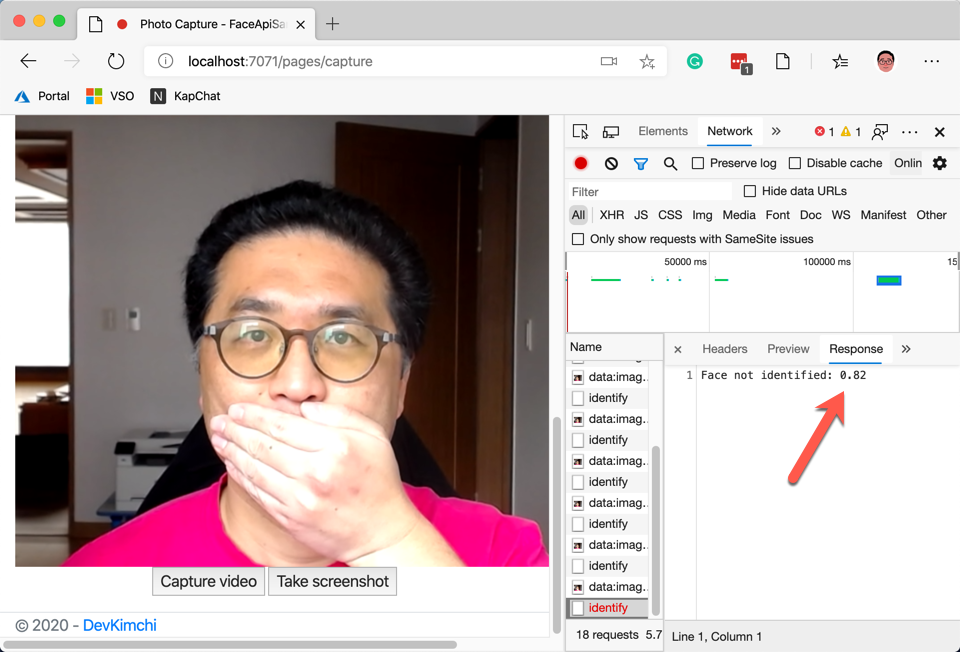
Once everything is done, the final result of FaceEntity is updated on the Azure Table Storage. The Confidence column in the table stores the face identification result, and FaceIds shows the list of control images.

So far, we've walked through how to identify my face through Azure Functions and Azure Face API. In fact, the algorithm for face identification is really hard to understand. However, the Face API is a fully managed service that we don't have to maintain – this is the key concept of this post. In the next post, as the final post of this series, I'll build a Power App to integrate the Function app.